Testing your RedTeam Infrastructure
As RedTeaming has grown with the industry, so has our need to build dependable environments. In keeping with the cat-and-mouse game we find ourselves in, it’s essential to possess the capability of maintaining robust infrastructure which can be recreated if discovered, and more importantly, we need to ensure that the environment is free of issues upon deployment.
Today I’m kicking off the first of a series of posts where we will be adopting some of the practices made popular by the DevOps teams we are often tasked with attacking, and hopefully using these technologies to help us build stable and tested infrastructure. Now admittedly, DevOps has developed into a bit of a buzzword over the years, but in a similar way to how the “RedTeam” term has been diluted by over-marketing, underneath it all there are core principals that we can benefit from.
In this post I’m going to start with a quick review of how RedTeam infrastructure is defined in code which would typically live in a Git repo somewhere. More importantly however, we will continue this by looking at ways in which our environments can be tested as they evolve and increase in complexity, finishing with a walkthrough of how we can introduce a CI pipeline into the mix to help automate this testing.
Managing our Infrastructure
The construction of a typical RedTeam infrastructure deployment has long been standardised with the concept of “redirectors”. At its most basic, a C2 deployment looks something like this:
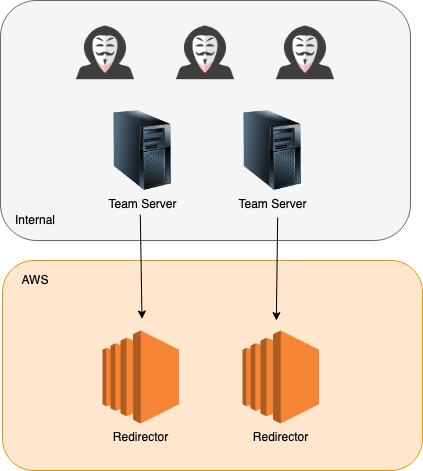
By now we all understand the advantages of utilising redirectors in front of our C2 framework of choice, giving us the ability to control customer sensitive data onsite via your teamserver, and masking the true source of traffic while allowing the recreation of these disposable redirectors quickly without the need to tear down backend servers.
So how is this all normally managed? Well over the years there have been a number of different ways I’ve seen environments deployed. The most common setup is where each component is deployed manually. For AWS users, this means spinning up EC2 instances via the management console, SSH’ing in, apt-get’ing NGINX, configuring SSH for reverse tunneling etc. And of course once BlueTeam finds the redirector, instances are tore down, new instances are spun up, and so on…
Now obviously this is tiresome and error-prone, so the idea of automating RedTeam infrastructure deployments has increased in popularity. Again there are different ways I’ve seen this done, from wrapping the aws or az shell commands in scripts, to the use of Terraform managing environments via configuration files.
For those manually deploying their environments, you will certainly know how easy it is to introduce misconfigurations when under pressure. Even with automated deployments, a change to a configuration file in the wrong place, or a misconfigured script opening up the environment a bit too much, and best case you may find that BlueTeam spot you very early on, worse case and you may potentially open yourself up to the wrong kind of attention (I’m looking at you Cobalt Strike fingerprinters ;).
Now the challenge of testing your infrastructure against a proposed design isn’t new, and is discussed all the time in non-InfoSec space. For anyone who has late-night binge watched those YouTube videos where Netflix engineers happily discuss tearing down parts of their infrastructure to test resilience, or proudly present how microservice architecture has allowed them to provide everyone with production access, we know just how good some companies are at this, and yet ironically as security professionals creating infrastructure responsible for maintaining paths into a client networks, I rarely see this discussed at all.
But before we get into testing our infrastructure, we actually need some infrastructure to test. So let’s start by spinning up some redirectors.
Terraform
To get started we will focus on the process of actually creating our infrastructure which will house our resources. Many of you will be familiar with Terraform, which is the popular tool from Hashicorp and has been covered by a number of people in the RedTeam space, such as RastaMouse who was one of the first people to highlight its power for managing offensive infrastructure in his blog posts back in 2017.
For anyone who isn’t familiar with this tool, Terraform allows you to create, update and destroy infrastructure on cloud services such as AWS, Azure and DigitalOcean. Infrastructure is described within HCL scripts and once designed, we then leave it to Terraform and its providers to “make it so“.
For the purpose of this post we’ll create a very simple environment consisting of 2 EC2 instances acting as redirectors. A Terraform script to do this would typically look something like this:
provider "aws" {
  region = "eu-west-2"
}

variable "INSTANCE_NAMES" {
  default = {
    "0" = "Redirector-ShortHaul"
    "1" = "Redirector-LongHaul"
  }
}

variable "PUBLIC_KEY" {
  default = "./keys/terraformkey.pub"
}

variable "MANAGEMENT_IP" {
  default = "1.2.3.4/32"
}

resource "aws_key_pair" "terraformkey" {
  key_name   = "${terraform.workspace}-terraform-key"
  public_key = file("${var.PUBLIC_KEY}")
}

resource "aws_security_group" "redirector-sg" {

  name = "redirector-sg"

  # Allow HTTP inbound
  ingress {
    protocol    = "tcp"
    cidr_blocks = ["0.0.0.0/0"]
    from_port   = 80
    to_port     = 80
  }

  # Allow HTTPS inbound
  ingress {
    protocol    = "tcp"
    cidr_blocks = ["0.0.0.0/0"]
    from_port   = 443
    to_port     = 443
  }

  # Allow management from our management IP
  ingress {
    protocol    = "tcp"
    cidr_blocks = ["${var.MANAGEMENT_IP}"]
    from_port   = 22
    to_port     = 22
  }

  # Allow global outbound
  egress {
    protocol    = "-1"
    cidr_blocks = ["0.0.0.0/0"]
    from_port   = 0
    to_port     = 0
  }
}

data "aws_ami" "ubuntu" {
  most_recent = true

  filter {
    name   = "name"
    values = ["ubuntu/images/hvm-ssd/ubuntu-bionic-18.04-amd64-server-*"]
  }

  filter {
    name   = "virtualization-type"
    values = ["hvm"]
  }

  owners = ["099720109477"]
}

resource "aws_instance" "redirector" {
  ami           = data.aws_ami.ubuntu.id
  instance_type = "t2.micro"
  count         = length(var.INSTANCE_NAMES)
  key_name      = aws_key_pair.terraformkey.key_name
  vpc_security_group_ids = [
    "${aws_security_group.redirector-sg.id}",
  ]

  tags = {
    Name    = "${var.INSTANCE_NAMES[count.index]}"
    JobName = "${terraform.workspace}"
  }
}

output "redirector_ips" {
    description = "Public IP addresses of created redirectors"
    value = aws_instance.redirector.*.public_ip
}
To ensure that we can run multiple instances of our infrastructure and not collide with other engagement resources, we normally create a new Terraform workspaces via:
terraform workspace new InsecureBank

But before we deploy, let’s test that everything is sane by executing terraform plan:
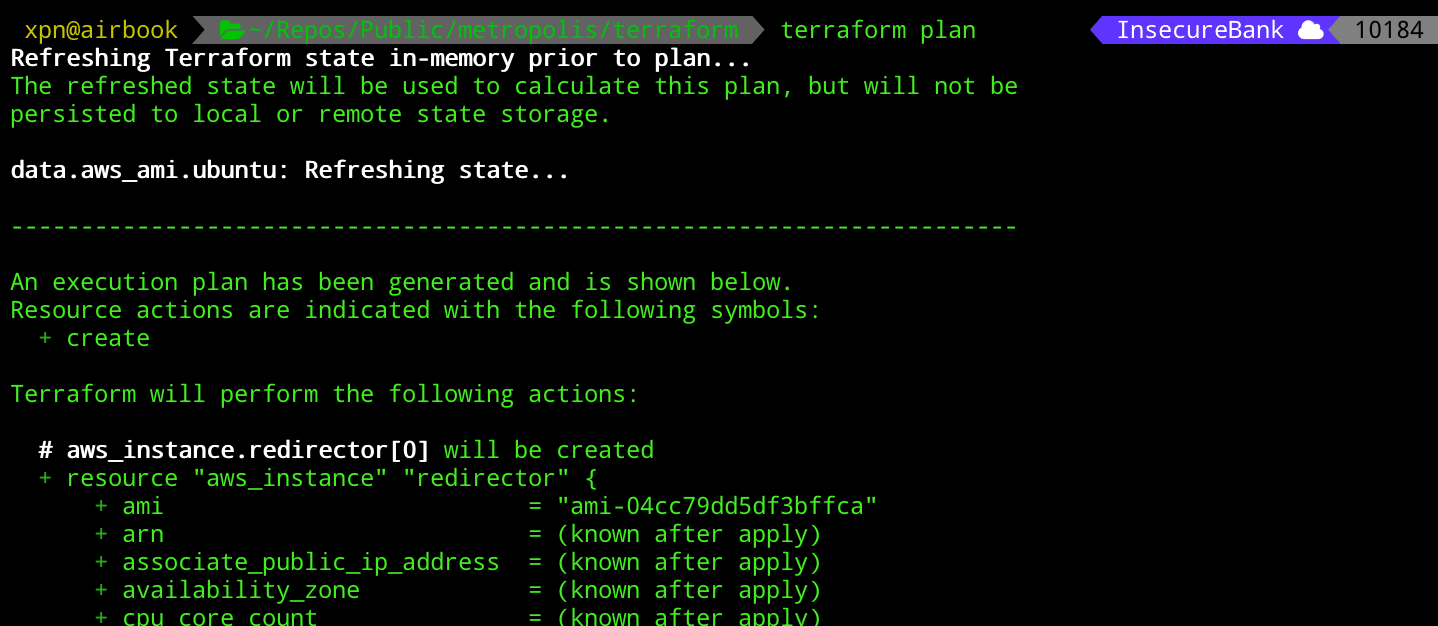
Once we have sanity checked everything, we can move onto our terraform apply command:
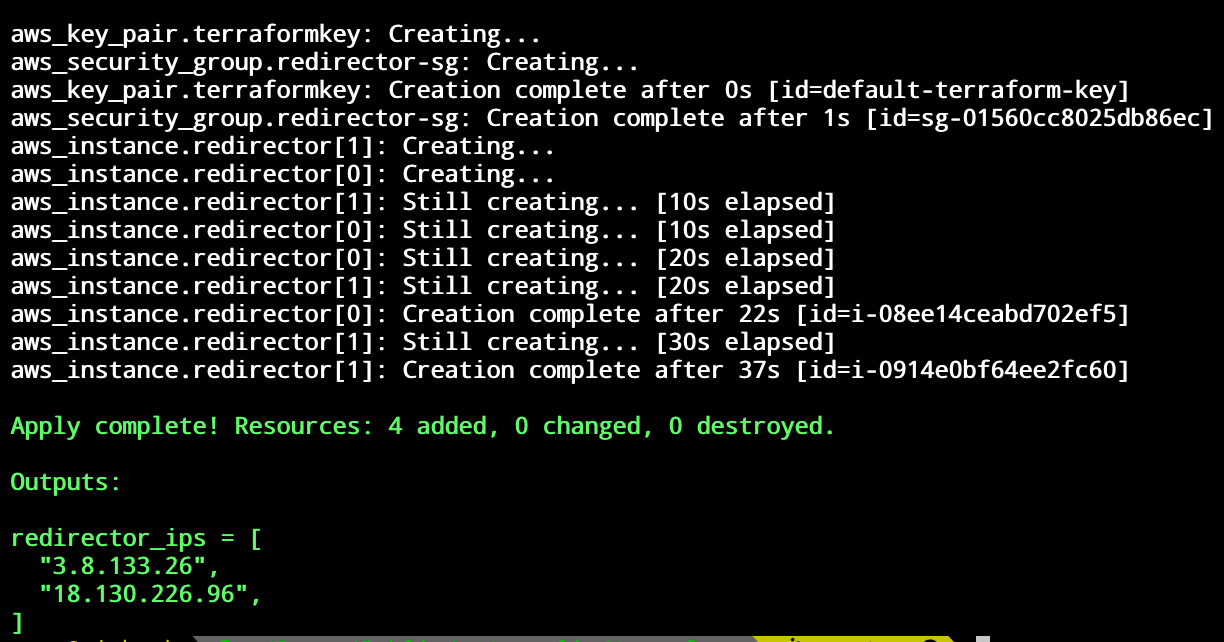
When Terraform completes, we can query AWS and verify that our servers have been created:
aws ec2 describe-instances --query 'Reservations[].Instances[].[Tags[?Key==`Name`].Value,InstanceType,PublicIpAddress]' --output json

With our redirectors now online, we next need to provision them. Don’t be tempted to SSH in here, there is no need to manually configure anything. Instead let’s take a look at how we can automate this step.
Ansible
Although there are different tools out there such as Chef and Puppet, Ansible has remained one of my favourite provisioning tools, and it’s community support is amazing.
So we know that we have 2 servers online that we want to now provision. We also know that their functionality is going to be identical, meaning that a well written Ansible playbook should be able to be applied to each.
Let’s start by creating our workspace. The following layout is what I’ve found to be useful for these kinds of projects:
.
├── ansible.cfg
├── playbooks
│   └── 10_example.yml
├── roles
│   ├── requirements.yml
│   └── ubuntu-nginx
│       ├── ...
└── site.yml
The idea of this layout is to provide locations to store our playbooks and roles, whilst including an Ansible configuration file which will provide the location of where our rules are stored. While this layout works for me, feel free to continue with your preferred workspace if you have one.
I try to stick with creating Ansible roles to encapsulate similar areas of configuration, for example, with a project like this we would create separate roles for areas such as:
- Hardening the base install
- Install nginx to expose HTTP(S) C2
- Configuring SSH for access from our team servers
- Adding any logging functionality
Obviously you can customise your redirectors as much as you like, but for this example let’s focus on the webserver role. Our role will be pretty simple and cover the following tasks:
- Ensuring required users and groups are added
- Installing NGINX
- Configuring NGINX for reverse proxying via a configuration file
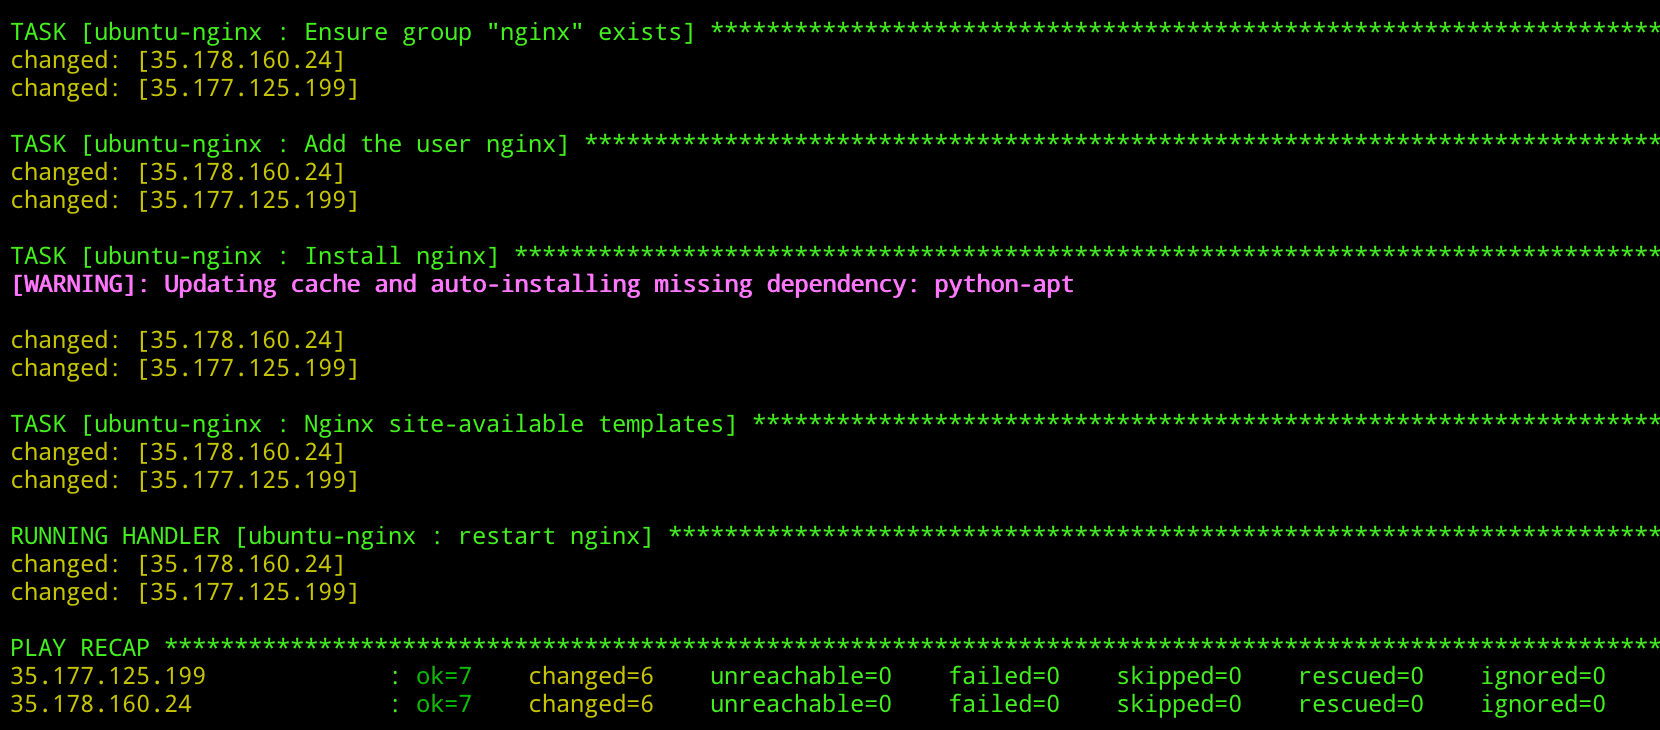
Put together, our Ansible role YAML might look something like this:
---
- name: Ensure group "nginx" exists
  group:
    name: nginx
    state: present

- name: Add the user nginx
  user:
    name: nginx
    shell: /bin/nologin
    groups: nginx

- name: Install NGINX
  apt:
    name: nginx
    state: present
    update_cache: yes

- name: Add NGINX configuration from template
  template:
    src: default.conf.j2
    dest: /etc/nginx/conf.d/default.conf
    owner: root
    group: root
    mode: 0644
  notify: restart nginx
Here we are taking a number of simple steps to add our nginx user, install NGINX, and add a configuration file crafted from a template. Once we have our role, we can apply it using a playbook, for example:
---
 - hosts: redirector*
   become: yes
   gather_facts: no
   pre_tasks:
        - raw: test -e /usr/bin/python || (apt -y update && apt install -y python-minimal)
        - setup: # aka gather_facts

   roles:
        - redirector-nginx
With our roles and playbooks constructed, the process of applying our Ansible roles to our redirectors is made straightforward by the terraform-inventory tool, which allows us to parse a Terraform state file and build an Ansible inventory dynamically. For example, with our above Ansible project, we can apply our roles using something like:
TF_STATE=../terraform ansible-playbook --inventory-file=/usr/local/bin/terraform-inventory -u ubuntu --private-key ../terraform/keys/terraformkey site.yml
Now consider this… how many times have you cloned your infra repo, attempted to spin things up, only to find that someone else has pushed a change and things no longer work as expected? Or you’ve added in some functionality that seemed like a good idea at the time, but realised that when preparing your environments, things just don’t look right?
Of course there are solutions to these kinds of issues, after all, in the development world unit testing and integration testing code is standard. And now with our infrastructure described within code living in Git we can apply similar practices. For this particular project there will be 2 areas that we will look to test. The first will be our Ansible roles which are responsible for actually provisioning our redirectors. The second will be the deployment of our AWS infrastructure that holds our redirectors, as well as the state of the actual AWS redirectors once deployed.
Testing Ansible Roles with Molecule
Developing Ansible roles can be a pain, mostly because of the time it takes to apply a role, check for errors, clean up your image, pray to lucifer, and repeat. Luckily for us there are tools to help with testing Ansible roles which also allow us to benefit from increased development speed. For this we will be using a framework called Molecule. This framework has been around for a while, and essentially allows you to deploy an Ansible role in isolation (for example, within a Docker container), and test the state of the container using TestInfra once the role has been applied.
To get started we will need to install Molecule using pip:
# Create our venv
python -m venv env
source ./env/bin/activate

# Install molecule
pip install --user molecule
Once installed, we will build some tests for our Ansible role. Molecule uses the concept of “scenarios” to describe a collection of test cases. Let’s create our default scenario to test our NGINX role using:
cd rolename; molecule init scenario -r rolename
This will result in a new directory being added to your Ansible role of molecule. If we take a look inside we will see something like this:
.
└── default
    ├── Dockerfile.j2
    ├── INSTALL.rst
    ├── molecule.yml
    ├── playbook.yml
    └── tests
        ├── test_default.py
        └── test_default.pyc
For this scenario our tests will be added to the test_default.py Python script and will use the TestInfra framework. But before we start, we should take some time to configure our scenario via the molecule.yml file. As I typically favour Ubuntu based servers I want to make sure that my tests are run within a similar environment. To do this we simply update the platforms section to:
platforms:
  - name: instance
    image: ubuntu:18.04
Next let’s create a few simple tests to show the power of this framework. We know that this role is going to deploy NGINX, so as a good starting point we can test to ensure that NGINX is actually installed after our role is run, which would look like this:
def test_nginx_installed(host):
    nginx = host.package("nginx")
    assert nginx.is_installed
We also want to make sure that NGINX is actually running when our role is applied:
def test_nginx_running(host):
    nginx = host.service("nginx")
    assert nginx.is_running
And what about our custom configuration with reverse proxy information? Well let’s add some checks to make sure that our configuration is actually present once the role is applied:
def test_nginx_configuration(host):
    passwd = host.file("/etc/nginx/conf.d/default.conf")
    assert passwd.contains("proxy_pass")
    assert passwd.user == "nginx"
    assert passwd.group == "nginx"
    assert passwd.mode == 0o644
With this added to our Molecule test case, let’s kick off a quick test to make sure everything works with:
molecule test
Now in our case we might see something like this:
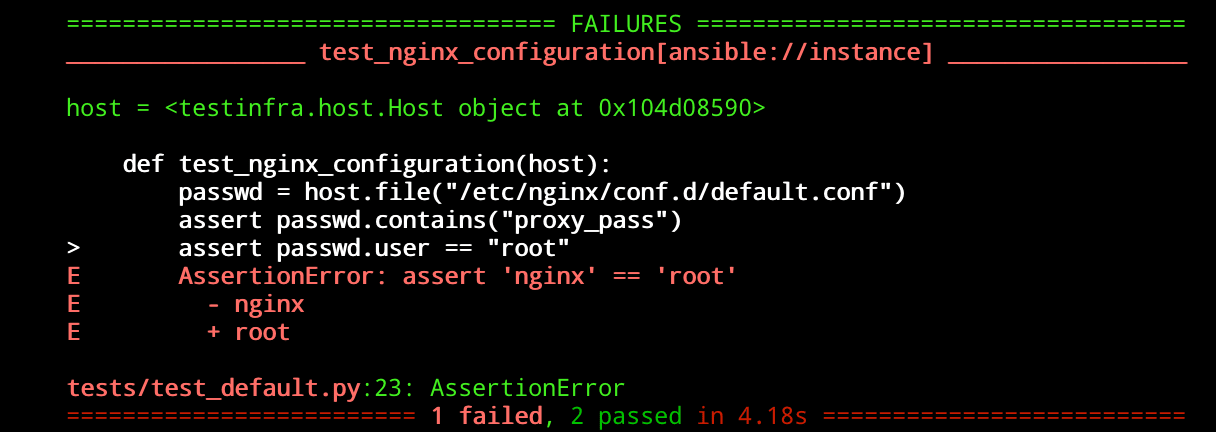
This means that the test failed as our NGINX configuration file is owned by root and our test is looking for a user of nginx, so let’s update our test to reflect this:
def test_nginx_configuration(host):
    passwd = host.file("/etc/nginx/conf.d/default.conf")
    assert passwd.contains("proxy_pass")
    assert passwd.user == "root"
    assert passwd.group == "root"
    assert passwd.mode == 0o644
And hopefully when we re-run our test we will sees something like this:

Of course you will need to expand your tests to contain the level of granularity required, but as you can see, once executed, we know that our role is performing exactly as we want.
Before we move on from testing Ansible roles, it is worth mentioning another advantage to using Molecule within your development workflow. I’ve always found that one of the pains of developing with Ansible are the numerous tweaks you have to make to get things to work just as expected, followed by cleaning up the environment, and repeating. Thankfully Molecule exposes the molecule converge command, which allows you to apply an Ansible role to your Docker container without running any tests. This means that you can continually apply your role to a container to make sure that it is progressing as intended while you develop. To check that you are on track, molecule login allows you to inspect the container, and if you make a mistake, you can cleanup via molecule destroy.
Now that we have a handle on our Ansible roles, let’s make sure that our actual deployment into AWS looks how we expect, using InSpec.
InSpec
InSpec is an awesome tool from the creators of Chef which allows us to test deployed infrastructure against a desired state. From available CIS benchmarks, to validating that a vulnerability has been patched in an environment, InSpec has a number of uses. For our example, we want to use InSpec to make sure that our deployed infrastructure meets a number of simple requirements:
- Are we only exposing our HTTP and HTTPS ports?
- Is SSH available to our management IP?
- Is NGINX up and running on both redirectors?
- Is our reverse proxy configuration applied to our redirectors?
With these simple test cases identified, let’s create a set of InSpec tests to verify that our deployed infrastructure matches our expectations.
First up we will need to initialise our AWS tests, which we can do with:
inspec init profile --platform aws aws_tests
This will create a template which will be laid out like this:
.
├── README.md
├── attributes.yml
├── controls
│   └── example.rb
├── inspec.lock
└── inspec.yml
For this post we will be working on example.rb (renamed to something sensible) to introduce some tests for the AWS environment that is built by Terraform.
If we focus on ensuring that our redirectors are online, and that our security group only exposes HTTP/S publicly, and SSH privately, we would end up with a set of test cases such as:
title "AWS"

describe aws_ec2_instance(name: 'Redirector-LongHaul') do
  it { should exist }
end

describe aws_ec2_instance(name: 'Redirector-ShortHaul') do
  it { should exist }
end

describe aws_security_group(group_name: 'redirector-sg') do
  it { should exist }
  it { should allow_in(port: 80, ipv4_range: '0.0.0.0/0') }
  it { should allow_in(port: 443, ipv4_range: '0.0.0.0/0') }
  it { should allow_in(port: 22, ipv4_range: '1.2.3.4/32') }
end
Ensure that your AWS profile is configured via the aws configure command or via environment variables, and we can run our InSpec tests using our default profile with:
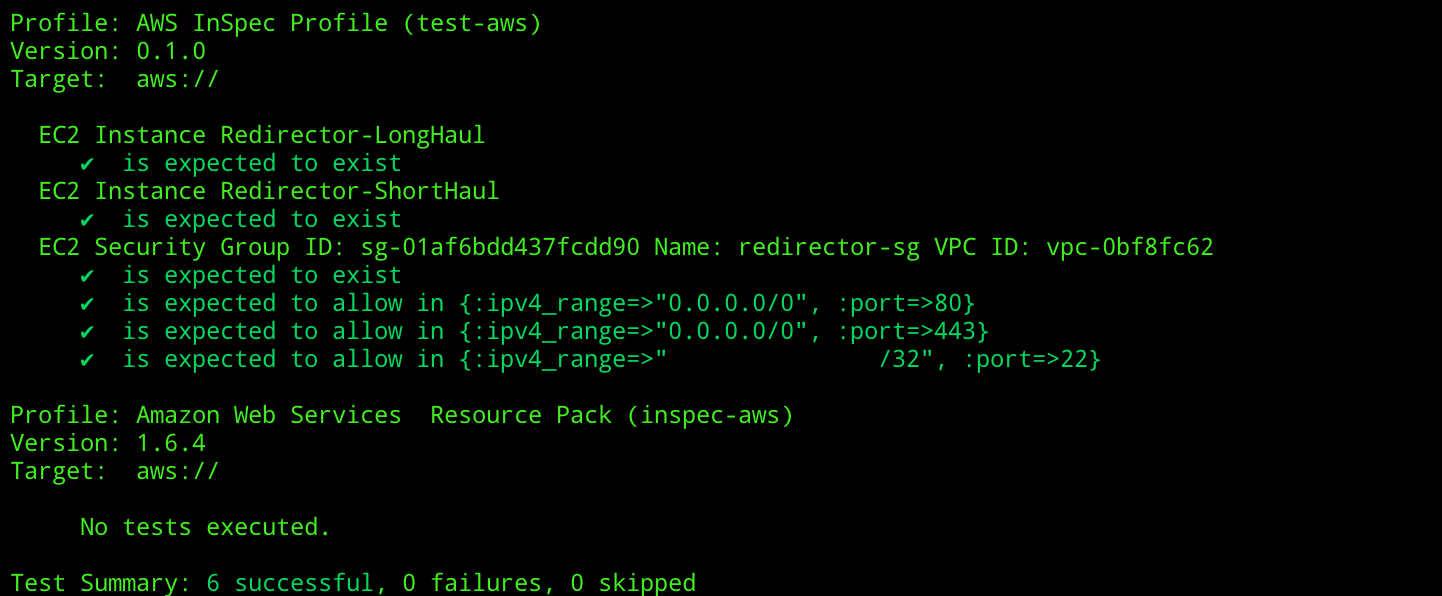
cd test-aws; inspec exec . -t aws://
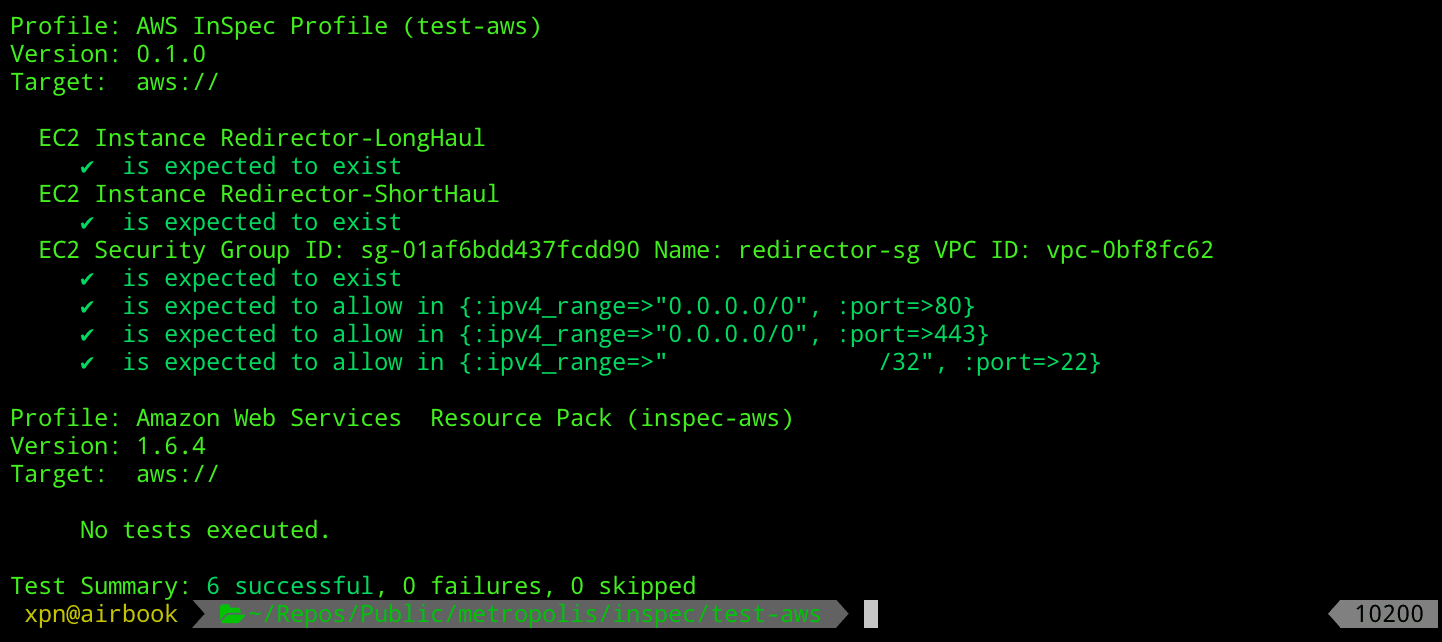
Hopefully if things go well, we should see that we receive confirmation from InSpec that everything checks out:
But what about our redirector configuration, how do we know that our Ansible roles were actually applied at all? Well again this is simple to check, we can create a template using:
inspec init profile redirectors
And add a few test cases, similar to our Molecule tests above:
title "Service Config"

describe service('nginx') do
  it { should be_installed }
  it { should be_enabled }
  it { should be_running }
end

describe service('ssh') do
  it { should be_installed }
  it { should be_enabled }
  it { should be_running }
end

describe file('/etc/nginx/conf.d/default.conf') do
    its('content') { should match %r{proxy_pass } }
end
And run via:
inspec exec . -t ssh://ubuntu@HOST -i ./keys/remotekey
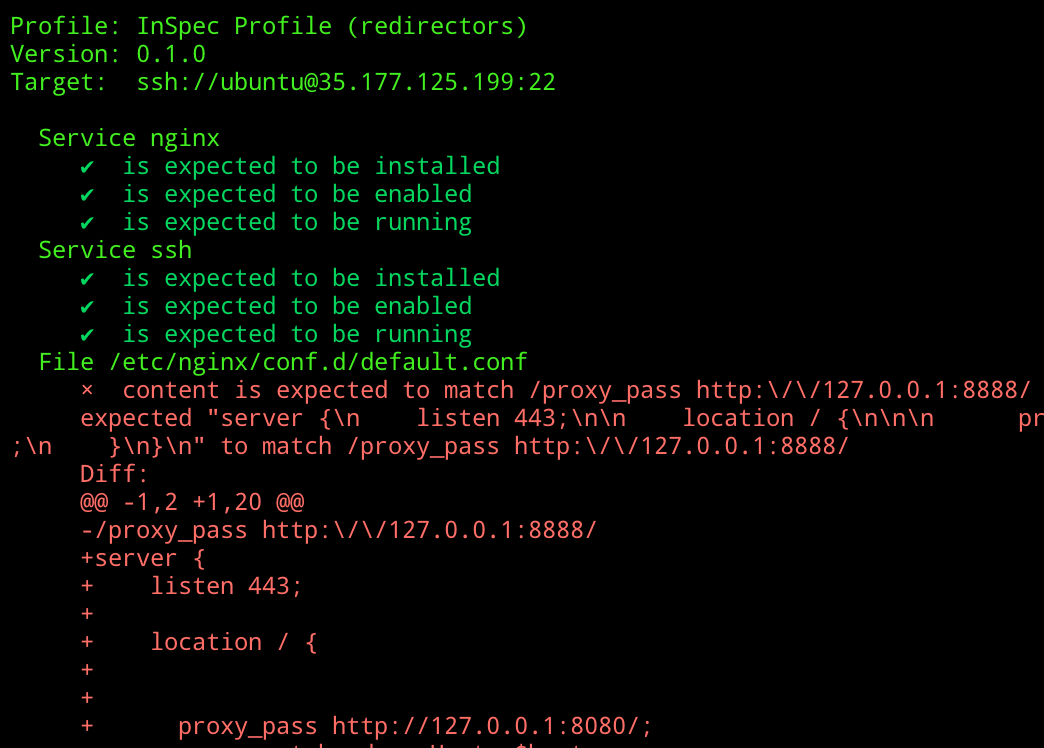
Here we have an example of an NGINX configuration file which doesn’t match our expected test. A quick change to either fix the Ansible role, or the InSpec test, and we should see that everything checks out:

Awesome, so let’s confirm what we have so far… we have Terraform scripts which can create our infrastructure. We have Ansible playbooks and roles which can provision our redirectors. We have Molecule tests to allow us to quickly develop and verify our roles, and finally we have InSpec tests to ensure that our infrastructure is created exactly as we expect.
Next up the fun bit… using this to keep our future infrastructure development in shape.
Glueing everything together in a CI Pipeline
So we now have all the bits to our puzzle, and we’re confident that our roles and infrastructure will spin up just as desired. But how can we ensure that each time someone make a change to any of these components that everything is running smoothly the next time we come to spin up, or re-spin up an environment? Well in the development world CI has become a useful practice to keep code in check. By enforcing tests to be run upon pushing to a Git server, we can be sure that merging code changes into Master will not cause a break the next time we come to deploy.
To create our CI pipeline we will be using Gitlab which is my current choice of hosted Git server. As well as being a nice place to host our Git repos, Gitlab also functions as a CI/CD platform, allowing us to execute tests, builds, and deployments via Gitlab Runners. If you prefer to use Github, check out James‘s post on Github Actions for a nice introduction to their CI/CD platform.
So what is CI exactly? CI means “Continuous Integration”, which is the practice of constantly merging changes from developers into a stable branch via a number of automated tests to make sure that a pushed commit hasn’t broken anything. The idea is that by using testing to maintain a level of quality during merges, you can deploy your stable branch continuously to production at any given time knowing that it should always function as intended (this is a simplified description of “Continuous Deployment”, but that’s a post for another day :).
To tie together each stage of our testing, we will need to describe each stage within a gitlab-ci.yml file which lives in the root of your project. This will allow us to construct our pipeline which we can use to take a Git push through testing, out to a staging environment, and through a series of validation steps to ensure that our infrastructure looks exactly as we want.
Each stage of our pipeline will be defined as:
- Test - Ansible Roles via Molecule
- Test - Terraform HCL validation
- Stage - Deploy to a testing environment
- Provision - Provision deployed servers with Ansible
- Validation - InSpec validation of testing environment
- Cleanup - Tear down infrastructure
Let’s break down each stage into how it will be represented in our gitlab-ci.yml file, starting with the definition of our individual pipeline stages:
stages:
  - test
  - stage
  - provision
  - validate
  - cleanup
Here we define each stage of our pipeline, which we can match to the steps that we defined above. Next we need to tell Gitlab what to do at each stage, starting with Terraform:
terraform_validate:
  image:
    name: hashicorp/terraform:light
    entrypoint:
      - '/usr/bin/env'
      - 'PATH=/usr/local/sbin:/usr/local/bin:/usr/sbin:/usr/bin:/sbin:/bin'
  stage: test
  script:
    - cd terraform
    - terraform init
    - terraform validate
The idea here is simple, we don’t want to move onto additional steps of the pipeline if the fundamental Terraform configuration doesn’t check out, so we run a simple validation step before moving on.
Once this stage is complete we move onto running our Molecule tests for our Ansible roles:
molecule_tests:
  image: docker:latest
  stage: test
  before_script:
    - apk update && apk add --no-cache docker
      python3-dev py3-pip docker gcc git curl build-base
      autoconf automake py3-cryptography linux-headers
      musl-dev libffi-dev openssl-dev openssh
    - docker info
    - python3 --version
  script:
    - pip3 install ansible molecule docker
    - cd ansible/roles/ubuntu-nginx
    - molecule test
Here we will be using the docker:latest image along with the “Docker-in-Docker” service to allow Molecule to spin up additional containers required to run the Molecule tests. It is worth noting that at this stage we are installing the Molecule framework during the pipeline stage execution. I wouldn’t recommend doing this in your own pipeline as it’s done here to demonstrate what is required to execute Molecule. In reality you would host a Docker image with everything pre-configured to speed up testing.
Once our pipeline reaches this stage we have verified that our Terraform files are syntactically correct, and that our Ansible roles pass each created test, so next we will deploy our infrastructure to AWS as a staging environment for further testing:
deploy_stage:
  image:
    name: hashicorp/terraform:light
    entrypoint:
      - '/usr/bin/env'
      - 'PATH=/usr/local/sbin:/usr/local/bin:/usr/sbin:/usr/bin:/sbin:/bin'
  stage: stage
  script:
    - cd terraform
    - terraform init
    - terraform apply --auto-approve
  artifacts:
    paths:
      - terraform/terraform.tfstate
    expire_in: 1 day
Similar to our previous Terraform stage, we are simply using Hashicorp’s Terraform Docker image to provide the Terraform tool, however after Terraform has run, we want to preserve the state file as an artifact. An artifact allows us to expose files from a stage, as well as providing the ability to pass created files onto subsequent stages of the pipeline, meaning that in this case we can pass our Terraform tfstate file along for later cleanup.
Now we have our redirectors deployed within the our staging environment, we need to provision them using Ansible:
provision_stage:
  stage: provision
  when: delayed
  start_in: 30 seconds
  image:
    name: hashicorp/terraform:light
    entrypoint:
      - '/usr/bin/env'
      - 'PATH=/usr/local/sbin:/usr/local/bin:/usr/sbin:/usr/bin:/sbin:/bin'
  before_script:
    - apk add ansible
    - wget https://github.com/adammck/terraform-inventory/releases/download/v0.9/terraform-inventory_0.9_linux_amd64.zip -O /tmp/terraform-inventory_0.9_linux_amd64.zip
    - unzip /tmp/terraform-inventory_0.9_linux_amd64.zip -d /usr/bin/; chmod 700 /usr/bin/terraform-inventory
  script:
    - cd terraform; terraform init; cd ..
    - cd ansible; chmod 600 .
    - chmod 600 ../terraform/keys/terraformkey
    - ANSIBLE_HOST_KEY_CHECKING=False TF_STATE=../terraform ansible-playbook --inventory-file=/usr/bin/terraform-inventory -u ubuntu --private-key ../terraform/keys/terraformkey site.yml
Again you would typically create a Docker image to speed up this stage, adding in the “terraform-inventory” tool as required.
Once our redirectors have been provisioned, we run our previously crafted InSpec tests against the AWS staging environment:
inspec_tests:
  stage: validate
  image:
    name: chef/inspec:4.18.51
    entrypoint:
    - '/usr/bin/env'
    - 'PATH=/usr/local/bundle/bin:/usr/local/sbin:/usr/local/bin:/usr/sbin:/usr/bin:/sbin:/bin'
  before_script:
    - apk add jq
  script:
    - inspec --chef-license=accept-silent
    - cd inspec
    - inspec exec redirectors -t "ssh://ubuntu@$(jq '.redirector_ips.value[0]' -r ../terraform/output.json)" -i ../terraform/keys/terraformkey
    - inspec exec redirectors -t "ssh://ubuntu@$(jq '.redirector_ips.value[1]' -r ../terraform/output.json)" -i ../terraform/keys/terraformkey
And finally, once everything is done, we clean up the environment after ourselves:
cleanup:
  when: always
  image:
    name: hashicorp/terraform:light
    entrypoint:
    - '/usr/bin/env'
    - 'PATH=/usr/local/sbin:/usr/local/bin:/usr/sbin:/usr/bin:/sbin:/bin'
  stage: cleanup
  script:
    - cd terraform
    - terraform init
    - terraform destroy --auto-approve
You may notice the when: always statement here. This simply means that this stage will run even if a previous stage failed. This gives us the opportunity to clean up the staging environment even if a test failed, to avoid building up unnecessary AWS charges.
When we put together our gitlab-ci.yml file, we get something like this:
image: docker:latest

services:
  - docker:dind

cache:
  key: ${CI_COMMIT_REF_SLUG}
  paths:
  - terraform/.terraform

stages:
  - test
  - stage
  - provision
  - validate
  - cleanup

terraform_validate:
  image:
    name: hashicorp/terraform:light
    entrypoint:
      - '/usr/bin/env'
      - 'PATH=/usr/local/sbin:/usr/local/bin:/usr/sbin:/usr/bin:/sbin:/bin'
  stage: test
  script:
    - cd terraform
    - terraform init
    - terraform validate

molecule_tests:
  image: docker:latest
  stage: test
  before_script:
    - apk update && apk add --no-cache docker
      python3-dev py3-pip docker gcc git curl build-base
      autoconf automake py3-cryptography linux-headers
      musl-dev libffi-dev openssl-dev openssh
    - docker info
    - python3 --version
  script:
    - pip3 install ansible molecule docker
    - cd ansible/roles/ubuntu-nginx
    - molecule test

deploy_stage:
  image:
    name: hashicorp/terraform:light
    entrypoint:
      - '/usr/bin/env'
      - 'PATH=/usr/local/sbin:/usr/local/bin:/usr/sbin:/usr/bin:/sbin:/bin'
  stage: stage
  script:
    - cd terraform
    - terraform init
    - terraform apply --auto-approve
    - terraform output --json > output.json
  artifacts:
    paths:
      - terraform/terraform.tfstate
      - terraform/output.json
    expire_in: 1 day

provision_stage:
  when: delayed
  start_in: 30 seconds
  image:
    name: hashicorp/terraform:light
    entrypoint:
      - '/usr/bin/env'
      - 'PATH=/usr/local/sbin:/usr/local/bin:/usr/sbin:/usr/bin:/sbin:/bin'
  stage: provision
  before_script:
    - apk add ansible
    - wget https://github.com/adammck/terraform-inventory/releases/download/v0.9/terraform-inventory_0.9_linux_amd64.zip -O /tmp/terraform-inventory_0.9_linux_amd64.zip
    - unzip /tmp/terraform-inventory_0.9_linux_amd64.zip -d /usr/bin/; chmod 700 /usr/bin/terraform-inventory
  script:
    - cd terraform; terraform init; cd ..
    - cd ansible; chmod 600 .
    - chmod 600 ../terraform/keys/terraformkey
    - ANSIBLE_HOST_KEY_CHECKING=False TF_STATE=../terraform ansible-playbook --inventory-file=/usr/bin/terraform-inventory -u ubuntu --private-key ../terraform/keys/terraformkey site.yml

inspec_tests:
  stage: validate
  image:
    name: chef/inspec:4.18.51
    entrypoint:
    - '/usr/bin/env'
    - 'PATH=/usr/local/bundle/bin:/usr/local/sbin:/usr/local/bin:/usr/sbin:/usr/bin:/sbin:/bin'
  before_script:
    - apk add jq
  script:
    - inspec --chef-license=accept-silent
    - cd inspec
    - inspec exec test-aws -t aws://
    - inspec exec redirectors -t "ssh://ubuntu@$(jq '.redirector_ips.value[0]' -r ../terraform/output.json)" -i ../terraform/keys/terraformkey
    - inspec exec redirectors -t "ssh://ubuntu@$(jq '.redirector_ips.value[1]' -r ../terraform/output.json)" -i ../terraform/keys/terraformkey

cleanup_stage:
  when: always
  image:
    name: hashicorp/terraform:light
    entrypoint:
    - '/usr/bin/env'
    - 'PATH=/usr/local/sbin:/usr/local/bin:/usr/sbin:/usr/bin:/sbin:/bin'
  stage: cleanup
  script:
    - cd terraform
    - terraform init
    - terraform destroy --auto-approve
Once committed to our project, we will see that we now have our pipeline available to us which will be executed upon each push. Hopefully all being well, once anyone pushes a commit to your infrastructure, you will receive a clear indication that everything checks out:

And there we have it, an example of how we can use a testing and a CI pipeline to keep our RedTeam infrastructure in good shape. Hopefully this overview can be of use, expect more posts on this topic to follow in the near future.