Using Hopper scripting to analyse MacRansom
This week, Objective-See published a walkthrough of the recently released “Malware as a Service” family, MacRansom, originally identified by FortiNet.
Patrick from Objective-See does a brilliant fly-by of the malware using LLDB, and presents some nice “anti anti-analysis” tricks. If you are interested in the internals of the malware, I’d recommend that you take a look.
Seeing how uncommon this type of “MaaS” is on MacOS (at the minute at least), this was a good opportunity to break out Hopper and see how well it handles malware analysis. If you have never used Hopper before, it is a low cost disassembler with incredible support for Objective-C and Swift binaries. This often makes it my goto disassembler for Mac applications.
In the case of MacRansom, we quickly see that this malware variant does not use either of the above. As we move to the entry point of the application with Hopper, we find a stack canary being added:
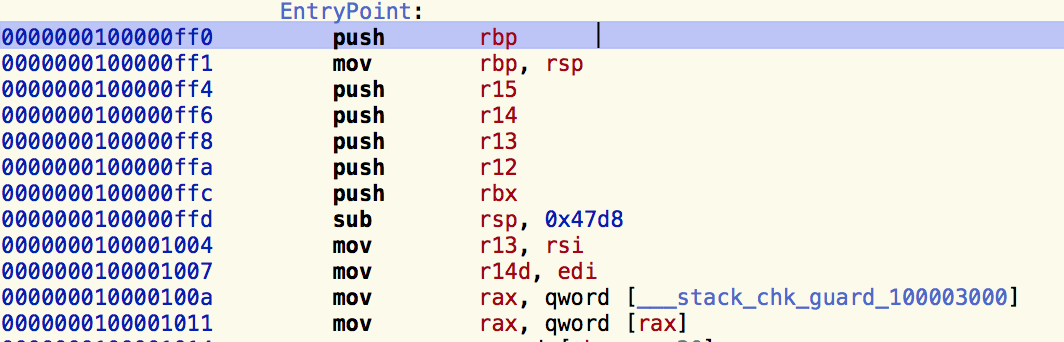
This, alongside the lack of any of the usual objc_msgsend calls, or method name mangling, indicate that this malware was likely written in C or C++.
As we continue, we notice there are no identified strings contained within the binary:
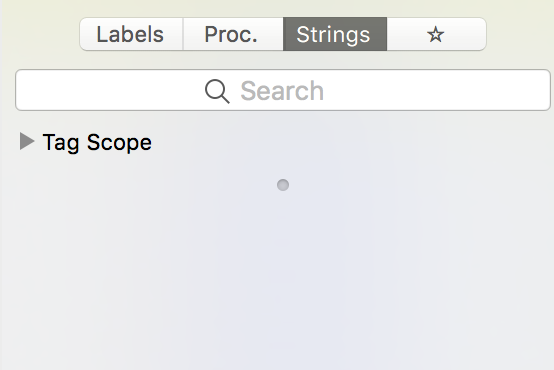
This can indicate a number of things, most likely is some form of encryption or packing, but it is certainly unusual for a binary to contain no identifiable strings at all.
Reviewing the disassembly, we come across an interesting function at address 0x100001f30 which is referenced throughout the malware and passed an argument of a pointer to a byte array. Looking at this function, we are quickly able to identify a common decryption signature:

As seen in this disassembly, the XOR decryption key is set to 0xf799b659. This instruction is applied to the buffer in 4 byte blocks. For example, if we take a QWORD from the address 0x100002aa0 (an address passed to the decryption method early on in the malware) and we apply the XOR key, we reveal the bytes 0x73 0x79 0x73 0x63 0x74 0x6c 0x20 0x68, or the ASCII string of sysctl h. This is obviously the reason we didn’t see any strings earlier :)
Now, analysis would be pretty tedious if we had to manually recover each string, so instead we turn to Hopper’s scripting functionality. Looking at xrefs, we see that the address 0x100002aa0 is the base of what appears to be a number of XOR encrypted values. This means that our Hopper script should:
- Read each DWORD starting at 0x100002aa0, and XOR each with the decryption key.
- Write the decrypted DWORD over the top of the encrypted DWORD.
- Search for any references to the decrypted string, and add an inline comment to make further analysis easier.
Using Python and Hoppers API, we can create a script that looks something like this:
#!/usr/bin/python

LEN = 0x500
START = 0x100002aa0
XOR_KEY = 0xf799b659

doc = Document.getCurrentDocument()
seg = doc.getCurrentSegment()

def decrypt(addr):
    data = seg.readUInt32LE(addr) ^ XOR_KEY
    return data

# Decrypt data
for x in range(0,LEN/4):
    decrypted = decrypt(START+(x*4))
    seg.writeUInt32LE(START+(x*4), decrypted)

# Add references to decrypted text
for x in range(0,LEN):
    refs = doc.getSegmentAtAddress(START+x).getReferencesOfAddress(START+x)
    decrypted = doc.getSegmentAtAddress(START+x).readUInt64LE(START+x)
    for ref in refs:
        try:
            doc.getSegmentAtAddress(ref).setInlineCommentAtAddress(ref, 'Decrypted: %s' % (doc.getSegmentAtAddress(ref).readBytes(START+x,16)))
        except:
            doc.getSegmentAtAddress(ref).setInlineCommentAtAddress(ref, 'Error referencing decryption')
After executing this Hopper script on the sample, we find that the decrypted strings are now available:

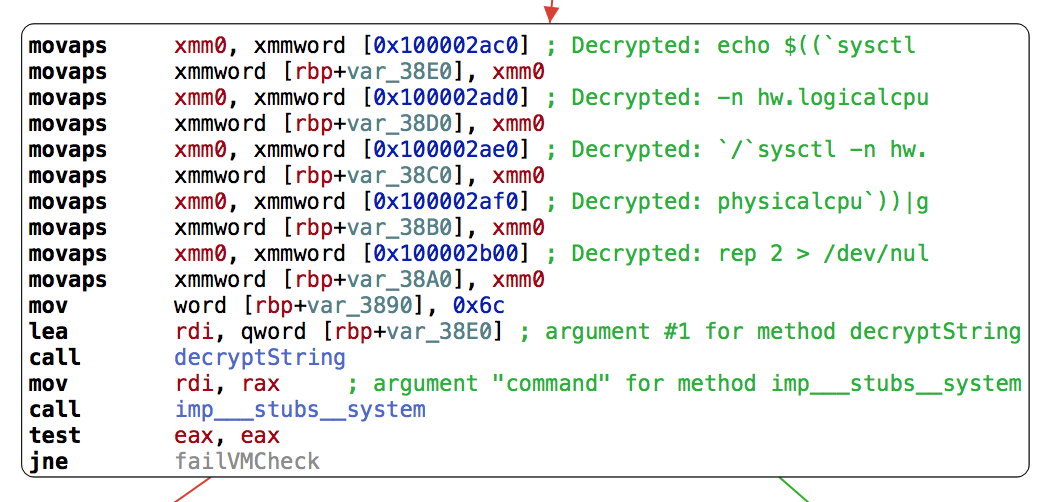
Additionally, inline comments added by the script makes it easier to follow the disassembly of the malware:

While this works in the majority of places, we find places where strings are constructed and decrypted based on register values, for example:

Here we can see the values 0xb6dce406d9b6c57c and 0xa8dcfb1d are added to the stack and passed to the decryption method. Again we can use Hoppers scripting capability again to make our life a bit easier when recovering these values:
#!/usr/bin/python

XOR_KEY = 0xf799b659

doc = Document.getCurrentDocument()
seg = doc.getCurrentSegment()
adr = doc.getCurrentAddress()

def decrypt(d):
    data1 = d & 0xFFFFFFFF
    data2 = d >> 32
    output = ""

    data1 ^= XOR_KEY

    output = "%c%c%c%c" % (chr(data1 & 0xFF), chr(data1 >> 8 & 0xFF), chr(data1 >> 16 & 0xFF), chr(data1 >> 24 & 0xFF))

    if data2 != 0:
        data2 ^= XOR_KEY
        output += "%c%c%c%c" % (chr(data2 & 0xFF), chr(data2 >> 8 & 0xFF), chr(data2 >> 16 & 0xFF), chr(data2 >> 24 & 0xFF))

    return output

inst = seg.getInstructionAtAddress(adr)
instStr = inst.getInstructionString()

if instStr.startswith("mov"):
    arg = inst.getRawArgument(1)
    try:
        decrypted = decrypt(int(arg,16))
        seg.setInlineCommentAtAddress(adr, "Decrypted: %s" % (decrypted))
    except:
        seg.setInlineCommentAtAddress(adr, "Error decrypting argument")
else:
    print "This is not a MOV instruction"
When we add this script to Hopper, we find that we now have the ability to decrypt values on the fly, by selecting the instruction and executing the script:

Now that we have a manageable disassembly complete with strings references, I wanted to see the ransomware execute in all its glory. We know from the earlier analysis by Patrick and Fortinet that MacRansom contains a number of “anti-analysis” checks to verify that it is not executing within a virtual machine or sandbox. As we have decrypted the string values, we can quickly identify these locations and add an appropriate bypass.
The first location is a simple sysctl hw.model check to make sure the malware is running on Mac hardware:

The second consists of a check on sysctl hw.logicalcpu and hw.physicalcpu to make sure there are at least 2 CPU’s present:

Knowing the locations of both checks, we can simply NOP out the jne instructions like so:

Finally, exporting this to an executable with Hopper and running in our VM gives us the show we were looking for:
If you want to try this out for yourself, a sample of the malware can be found over on Objective-See’s blog post here.