The Accidental C2 - Exploring Dev Tunnels for Remote Access
I started writing this blog post on a flight from Manchester to JFK. Whenever I travel, I typically pick a small project from my research backlog, throw on the headphones, and tune the world out until I land. And this trip was no different, giving me about 7 hours to focus on a topic that had been bugging me for a while, Visual Studio Code Dev Tunnels.
Others have poked at dev tunnels for proxying C2 traffic, but VS Code itself can execute remote shell commands and move files around. So there has to be something underneath that is useful during Red Team assessments.
Normally I wouldn’t attempt to start a project like this on a transatlantic flight, mostly because dev tunnels rely heavily on a stable internet connection (and most of the time the £25 inflight Wi-Fi connection feels like IPoAC). But this time there was something new I was counting on to help with the instability.
Setting Bishop Loose
“Bishop” (named after the android science officer in Alien) is my new LLM rig. It is a base M4 Mac mini and is solely tasked with handling long-running Claude Code, Codex, and OpenCode sessions remotely.
My hope was to mitigate the unstable Wi-Fi by kicking off new tasks remotely, letting the LLMs grind away, and pulling back a distilled report whenever connectivity resumed.
So I began with a simple prompt:
I am creating a research-project into VS Code Dev Tunnels. Primarily the goals of this research will be:

1. Create a standalone tool which will allow me to list/add/interact with existing dev-tunnels
2. Interact with existing authentication tokens (Azure/GitHub) to view existing tunnels and interact with them

First I need to understand how they work under the hood. This will be imperative to understanding how my research will go.

The repo is at: https://github.com/microsoft/vscode.git

First take a clone of this and start exploring, looking for answers to the above.

Other resources which may be useful:

* https://github.com/microsoft/dev-tunnels.git - Dev Tunnels source
Amazingly, tasking the GPT-5.4-Cyber model returned an initial report within a few minutes, giving me a good overview of how the Dev Tunnels protocol worked and where the relevant sections of code could be found.
The initial report can be found here if you are interested.
Further iterations and code examples were generated, again meaning that while focusing on researching, I had other agents iterating on the task in the background.
The Layers of VS Code Dev Tunnels
Dev Tunnels have been around for a while now in VS Code. You see them normally presented in the sidebar within Remote Explorer:
You may be forgiven for thinking that the underpinnings of this functionality are pretty simple. After all, you are essentially setting up an HTTP tunnel between two hosts, and we know that Microsoft has several products for tunneling, how hard could it be?
Unfortunately, Microsoft’s dev tunnels turned out to be multi-layered and very non-standard, which means that to understand how this all works, I had to unpick each layer alongside Bishop.
The easiest way I found to tackle this was to start at the beginning of the client to server connection flow and recreate each layer. So let’s start with how VS Code searches for existing tunnels, and work through each layer until we reach code execution.
Layer 0 – REST Management
When connecting to an existing dev-tunnel, VS Code needs to understand what existing servers are available. This is done by making a GET request to a standard JSON REST endpoint:
GET /tunnels?includePorts=true&labels=vscode-server-launcher&allLabels=true&global=true&api-version=2023-09-27-preview HTTP/1.1
Host: global.rel.tunnels.api.visualstudio.com
Authorization: github gho_GITHUB_TOKEN_HERE
User-Agent: vscode.dev.remote-server Dev-Tunnels-Service-TypeScript-SDK/1.2.1
The response then provides information on the range of tunnels available to us:
HTTP/1.1 200 OK
...
{
    "value": [{
        "regionName": "UkSouth",
        "value": [{
            "clusterId": "uks1",
            "tunnelId": "wild-fog-s1alk0t",
            "name": "",
            "description": "",
            "labels": ["prometheus", "protocolv4", "vscode-server-launcher", "_flag3"],
            "options": {
                "isGloballyAvailable": true
            },
            "status": {
                "hostConnectionCount": 0,
                "lastHostConnectionTime": "2026-04-08T16:16:57Z",
                "clientConnectionCount": {
                    "current": 0,
                    "limit": 20
                },
                "lastClientConnectionTime": "2026-03-31T23:11:04Z",
                "clientConnectionRate": {
                    "current": 0
                },
                "uploadRate": {
                    "periodSeconds": 1,
                    "resetTime": 0,
                    "current": 0,
                    "limit": 20971520
                },
                "downloadRate": {
                    "periodSeconds": 1,
                    "resetTime": 0,
                    "current": 0,
                    "limit": 20971520
                },
                "uploadTotal": 45013860,
                "downloadTotal": 19000550,
                "apiReadRate": {
                    "current": 0
                },
                "apiUpdateRate": {
                    "current": 0
                }
            },
            "endpoints": [{
                "hostRelayUri": "wss://uks1-data.rel.tunnels.api.visualstudio.com/api/v1/Host/Connect/wild-fog-s1alk0t",
                "clientRelayUri": "wss://uks1-data.rel.tunnels.api.visualstudio.com/api/v1/Client/Connect/wild-fog-s1alk0t",
                "id": "45e5e54c-1acf-41f3-96d4-c2085c0dfe35-relay",
                "connectionMode": "TunnelRelay",
                "hostId": "45e5e54c-1acf-41f3-96d4-c2085c0dfe35",
                "portUriFormat": "https://a5n51h3l-{port}.uks1.devtunnels.ms/",
                "tunnelUri": "https://a5n51h3l.uks1.devtunnels.ms/",
                "portSshCommandFormat": "ssh a5n51h3l-{port}@ssh.uks1.devtunnels.ms",
                "tunnelSshCommand": "ssh a5n51h3l@ssh.uks1.devtunnels.ms"
            }],
            "ports": [{
                "clusterId": "uks1",
                "tunnelId": "wild-fog-s1alk0t",
                "portNumber": 31545,
                "protocol": "auto",
                "options": {
                    "isGloballyAvailable": true
                },
                "status": {},
                "portForwardingUris": ["https://a5n51h3l-31545.uks1.devtunnels.ms/"],
                "inspectionUri": "https://a5n51h3l-31545-inspect.uks1.devtunnels.ms/"
            }],
            "created": "2025-11-03T11:20:51.376614Z",
            "expiration": "2026-05-08T16:17:03Z"
        },
        ...
To connect to a running tunnel server, we next need to generate an access token. Before we can do this, however, we need a few things from the above response:
clusterId– The relay cluster that the target tunnel is assigned to.tunnelId– This is the random name given to the tunnel on creation, and will look likecheeky-sausage-a123456b7
With this information available, we can then request a new access token with:
GET /tunnels/wild-fog-s1alk0t?includePorts=true&tokenScopes=connect&api-version=2023-09-27-preview HTTP/1.1
Host: CLUSTERID.rel.tunnels.api.visualstudio.com
Authorization: github gho_GITHUB_TOKEN_HERE
User-Agent: vscode.dev.remote-server Dev-Tunnels-Service-TypeScript-SDK/1.2.1
We can see from the URL parameters that we are requesting a connect scoped token which we receive in the response:
HTTP/1.1 200 OK
...
{
    "clusterId": "uks1",
    "tunnelId": "wild-fog-s1alk0t",
    "name": "",
    "description": "",
    "labels": ["prometheus", "protocolv4", "vscode-server-launcher", "_flag8"],
    "accessTokens": {
        "connect": "eyJhbGci[REDACTED]FxfRpNXiNGjcw"
    },
    "accessControl": {
        "entries": []
    },
    "options": {
        "isGloballyAvailable": true
    },
    "status": {
        "hostConnectionCount": 0,
        "lastHostConnectionTime": "2026-04-13T16:05:29Z",
        "clientConnectionCount": {
            "current": 0,
            "limit": 20
        },
        "lastClientConnectionTime": "2026-04-13T15:46:16Z",
        "clientConnectionRate": {
            "current": 0
        },
        "uploadRate": {
            "periodSeconds": 1,
            "resetTime": 0,
            "current": 0,
            "limit": 20971520
        },
        "downloadRate": {
            "periodSeconds": 1,
            "resetTime": 0,
            "current": 0,
            "limit": 20971520
        },
        "uploadTotal": 6366,
        "downloadTotal": 15840,
        "apiReadRate": {
            "current": 0
        },
        "apiUpdateRate": {
            "current": 0
        }
    },
    "endpoints": [{
                "hostRelayUri": "wss://uks1-data.rel.tunnels.api.visualstudio.com/api/v1/Host/Connect/wild-fog-s1alk0t",
                "clientRelayUri": "wss://uks1-data.rel.tunnels.api.visualstudio.com/api/v1/Client/Connect/wild-fog-s1alk0t",
                "id": "45e5e54c-1acf-41f3-96d4-c2085c0dfe35-relay",
                "connectionMode": "TunnelRelay",
                "hostId": "45e5e54c-1acf-41f3-96d4-c2085c0dfe35",
                "portUriFormat": "https://a5n51h3l-{port}.uks1.devtunnels.ms/",
                "tunnelUri": "https://a5n51h3l.uks1.devtunnels.ms/",
                "portSshCommandFormat": "ssh a5n51h3l-{port}@ssh.uks1.devtunnels.ms",
                "tunnelSshCommand": "ssh a5n51h3l@ssh.uks1.devtunnels.ms"
     }],
    ...
Again from this response we need to take a few items before moving on:
connectToken– The JWT Access Token needed to connect to the relay serverclientRelayUri– The client WebSocket URI we will need to connect to
With the access token generated, we can move onto the next layer. But before we do, let’s take a slight detour and discuss initial authentication.
Authentication with GitHub
As you’ll likely have noticed from the Authorization header above, a GitHub token is used when making requests to the REST server.
This token is generated as a result of the OAuth2 flow initiated by VS Code when you first set up dev tunnels using your GitHub account (with the GitHub OAuth2 Client ID 01ab8ac9400c4e429b23 and the scopes read:org and user:email ):
This Client ID is also approved for the Device Code flow, meaning that Device Code Phishing is viable as a method of gaining a GitHub token for dev tunnels authentication:
POST /login/device/code HTTP/1.1
Host: github.com

client_id=01ab8ac9400c4e429b23&scope=read:org,user:email
Once the OAuth2 dance is complete, GitHub returns a token:
HTTP/1.1 200 OK
...

{
    "access_token": "gho_[REDACTED]",
    "token_type": "bearer",
    "scope": "read:org,user:email"
}
It is this access_token value that is used in the initial API REST call within the Authorization: github TOKENHERE header to generate the connect token.
Authentication with Azure
If you are using Entra ID as your SSO provider of choice, the authentication token again follows the standard Microsoft OAuth2 flow, with a Client ID of aebc6443-996d-45c2-90f0-388ff96faa56 and a scope of 46da2f7e-b5ef-422a-88d4-2a7f9de6a0b2/all.
The response we get is a typical access token and refresh token:
HTTP/1.1 200 OK
...
{
    "token_type": "Bearer",
    "scope": "46da2f7e-b5ef-422a-88d4-2a7f9de6a0b2/all 46da2f7e-b5ef-422a-88d4-2a7f9de6a0b2/.default",
    "expires_in": 4397,
    "ext_expires_in": 4397,
    "access_token": "[REDACTED]",
    "refresh_token": "[REDACTED]",
    "id_token": "[REDACTED]",
 }
This Access Token is then used in the Authorization header as a Bearer token.
For the purposes of tunneling, GitHub and Azure serve as separate containers for tunnel sessions. This means that a VS Code tunnel server authenticated with GitHub cannot be accessed using an Entra ID account and vice versa.
For now we’ll stop there, but we will come back to this authentication flow at a later point in the post.
Layer 1 – WebSocket Tunnel
With the REST layer complete, next up is a WebSocket connection.
This WebSocket connection is established to the previously observed clientRelayUri returned in the endpoints JSON blob.
The initial HTTP request is:
GET /api/v1/Client/Connect/new-cat-zpzt4s0 HTTP/1.1
Authorization: tunnel [CONNECT-TOKEN-HERE]
Upgrade: websocket
Connection: Upgrade
Sec-WebSocket-Version: 13
Sec-WebSocket-Key: w17AVnNaZMHAkcZ6BrYzyg==
Host: uks1-data.rel.tunnels.api.visualstudio.com
Sec-WebSocket-Protocol: tunnel-relay-client-v2-dev, tunnel-relay-client
In the Sec-WebSocket-Protocol header we have two subprotocols, however, in the case of VS Code, we are going to focus on tunnel-relay-client, which signifies the protocol type and authentication methods used to establish an SSH connection over the established WebSocket tunnel.
As seen in the above request, the previously generated connect JWT token is now used within the Authorization header.
Once this handshake completes and the WebSocket tunnel is up, the Microsoft Relay Server acts as a connector between the client WebSocket and the server WebSocket, relaying information between the two to avoid any firewall or masquerading issues.
Layer 2 – SSH Connection
With the first layer established, VS Code next initiates a SSH client connection over the WebSocket tunnel.
Unfortunately this is where things get a little more difficult. When a new dev-tunnel server is set up via VS Code (or by doing a code --tunnel on the CLI), the Rust crate russh is used. If we attempt to connect to this SSH server using something standard like golang’s crypto/ssh or Python’s Paramiko we only get so far before things stop working.
When the SSH connection is established, the username tunnel is used along with the None authentication method. This is permitted as the outer WebSocket layer has been authenticated by connect JWT.
In the case of VS Code, the tunnel setup negotiates the HMAC_SHA256_ETM MAC algorithm using KEX. If this is not negotiated, then the SSH connection will fail during the authentication handshake.
Once authentication is complete, a port forward from the server to the client is completed. However, to initiate this, it is the client (and not the server) that uses the forwarded-tcpip channel to establish a connection to the server port 31545. This deviates from the norm as usually a forwarded-tcpip channel is initiated from the server when a connection is made to a remote port forward (ssh -R 8080:localhost:8080), which of course means that standard libraries fail without modification.
If we use the russh crate as our SSH client, the patch required can be found here and can be applied with:
git apply ../patch/russh.patchAt this stage our SSH tunnel connection has been established within the WebSocket tunnel.
Layer 3 – MsgPack RPC
With the SSH tunnel now up and authenticated, we now have the ability to exchange messages. Messages between client and server are serialised with MsgPack. The RPC message format looks like this:
pub struct Request<T> {
	pub id: u32,
	pub method: String,
	pub params: T
}
As Bishop reviewed the source code, the following useful RPC methods were surfaced:
spawn_cli– Execute a command using the built in shell via the VSCode server binaryspawn– Execute a command directlyfs_read– Read file contentfs_write– Write file contentfs_connect– Tunnel a named pipe or unix socket over the tunnelfs_stat– Gather information on a filefs_rm– Delete a filefs_mkdirp– Create a new directoryfs_readdir– List a directory contentsfs_rename– Rename a filesys_kill– Kill a process
One supported RPC method I wanted to POC was the spawn command, which executes a remote command on the tunnel server. The parameters passed within the request are:
pub struct SpawnParams {
    pub command: String,
    pub args: Vec<String>,
    pub cwd: Option<String>,
    pub env: HashMap<String, String>,
}
Responses from the server also come encoded as:
pub struct SuccessResponse<T> {
    id: u32,
    result: T,
}
And in the case of “Spawn”, the result will be:
pub struct SpawnResult {
    pub message: String,
    pub exit_code: i32,
}
To allow each RPC method to be invoked individually, Bishop and I have created a tool named Ouroboros which encapsulates RPC commands into a single Rust tool and is available here:
https://github.com/xpn/Ouroboros
The usage of this tool is straightforward. You can list existing tunnels associated with the account token with the management command:
[*] Starting Ouroboros Management Client
Tunnel List:
Name: sneaky-fog-s6llk1t
        Labels: ["prometheus", "protocolv4", "vscode-server-launcher", "_flag3"]
        Created: "2025-11-03T11:20:51.376614Z"

Name: interesting-pony-lztwqbj
        Labels: ["serenity", "protocolv4", "vscode-server-launcher", "_flag8"]
        Created: "2026-04-13T11:54:57.1330336Z"

Name: new-cat-zpzt4s1
        Labels: ["bishop", "protocolv4", "vscode-server-launcher", "_flag8"]
        Created: "2026-03-20T12:59:47.5209985Z"

Name: swift-dog-jzb5q13
        Labels: ["romulus", "protocolv4", "vscode-server-launcher", "_flag8"]
        Created: "2026-03-31T13:06:23.5272748Z"
And once you have your target picked out:

Using Ouroboros for our D33dz
So where do I see this tool fitting into our expanding arsenal? There are multiple places this tradecraft fits, the most obvious being persistence, by setting up a new tunnel from an existing compromised host.
Ouroboros also allows us to pivot nicely for lateral movement to other systems running dev tunnels. The API credentials are stored in the state.vscdb database and encrypted using Electron’s safeStorage, meaning that tokens can be pulled by any process running under the same user account as VS Code, via the inspect-brk trick:
But there is actually another scenario where dev tunnels can be useful, and that is of course for initial access.
Let’s revisit what is required to access dev tunnels. When authentication first kicks off, access to an Entra token is requested via OAuth2:
POST /organizations/oauth2/v2.0/token?client-request-id=ab6dc52d-ddf8-40bc-8300-f1a4bf27a4d2 HTTP/1.1
Content-Type: application/x-www-form-urlencoded;charset=utf-8
Host: login.microsoftonline.com
...

client_id=aebc6443-996d-45c2-90f0-388ff96faa56&
redirect_uri=http%3A%2F%2Flocalhost%3A50906&
scope=46da2f7e-b5ef-422a-88d4-2a7f9de6a0b2%2F.default%20email%20openid%20profile%20offline_access&
code=CODE-HERE&
x-client-SKU=msal.js.node&
x-client-VER=3.8.3&
x-client-OS=darwin&
x-client-CPU=arm64&
x-ms-lib-capability=retry-after%2C%20h429&
x-client-current-telemetry=5%7C871%2C0%2C%2C%2C%7C%2C&
x-client-last-telemetry=5%7C0%7C%7C%7C0%2C0&
code_verifier=zkg1aTdQZ1k2RnUablgxQXljBWhMU0taUGl1dnVoTVpz&
grant_type=authorization_code&client_info=1
Using entrascopes.com, we quickly see that this Client ID is associated with Visual Studio Code.
The resource is 46da2f7e-b5ef-422a-88d4-2a7f9de6a0b2 and this is for the Dev Tunnels Service:
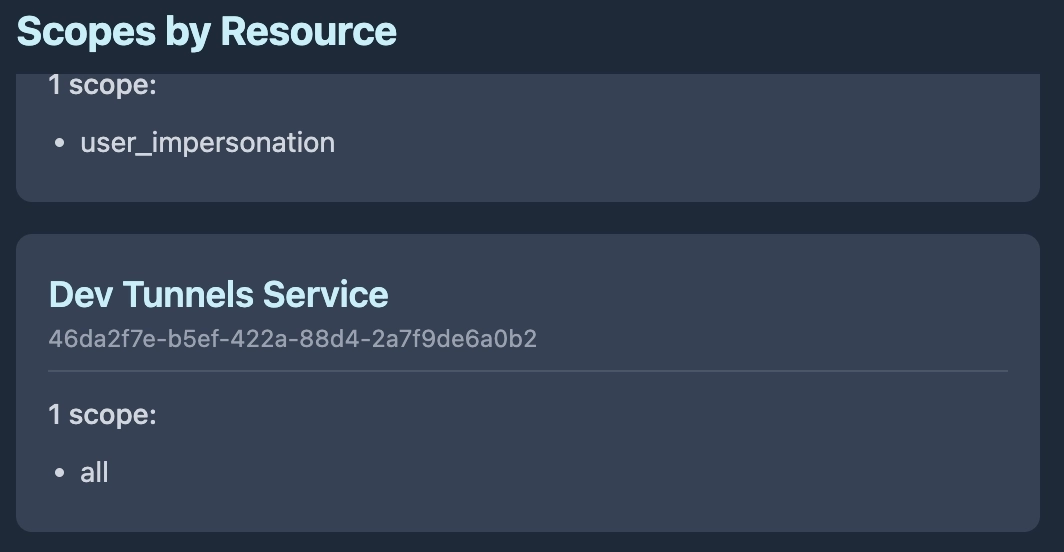
If we cross check this resource access with other Entra clients, we find that several also have access to the Dev Tunnels Service.
This means if you are able to gather a user access token for any of the clients in this list, you have everything you need to access the users and/or organization’s dev tunnels:
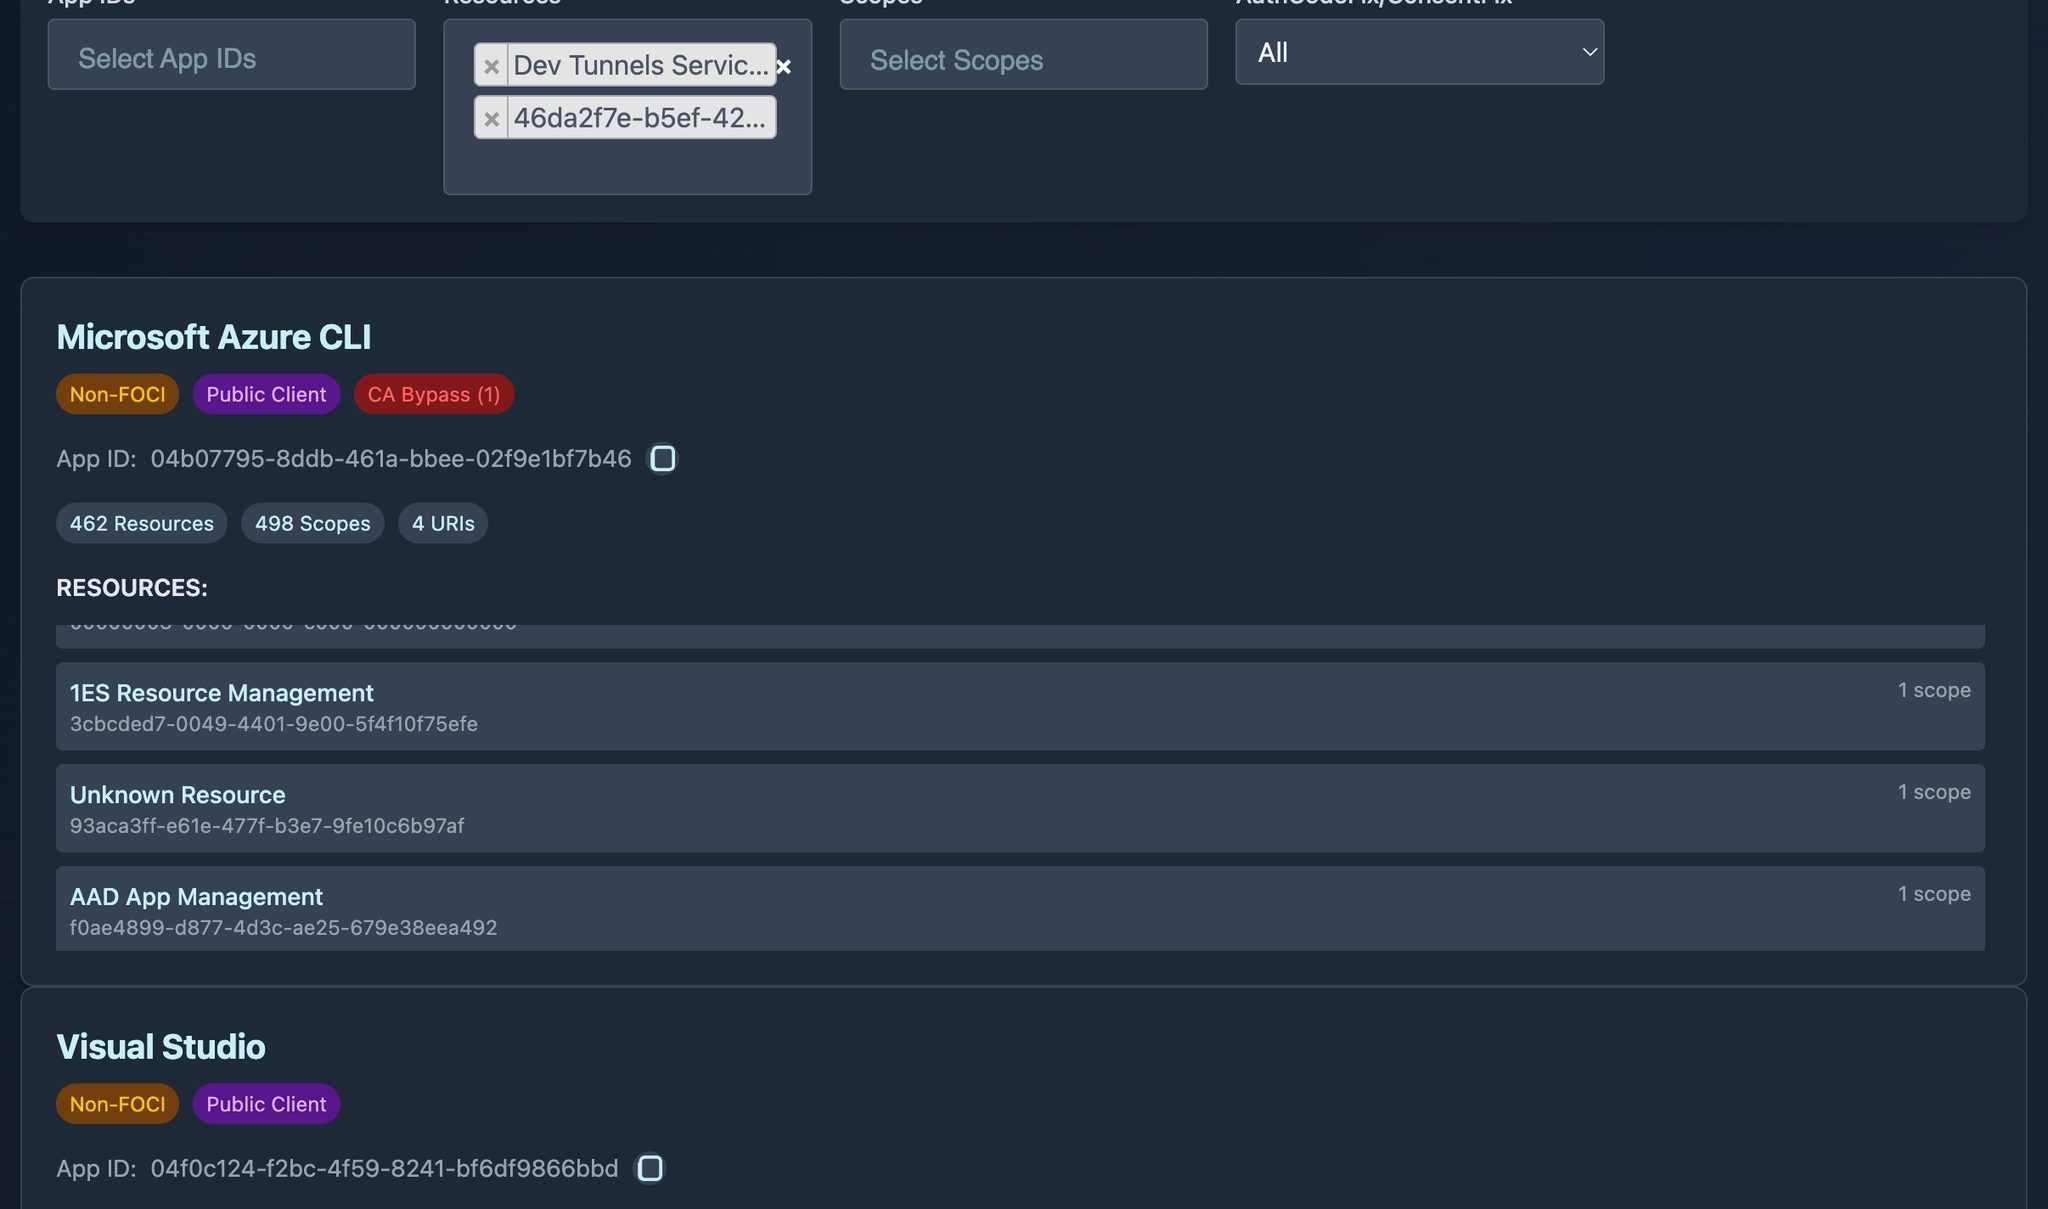
But we can take that one step further. If we look closely, we can see that one of the clients is a member of the Family of Client IDs (FOCI):
https://entrascopes.com/?appId=872cd9fa-d31f-45e0-9eab-6e460a02d1f1
What does this mean? It means that if we can compromise any of the FOCI members, we can gain an access token to dev tunnels, for example:
This diagram shows only 3 potential clients, but actually there are 49 FOCI clients at the time of posting this research, which can be found here: https://entrascopes.com/?foci=true
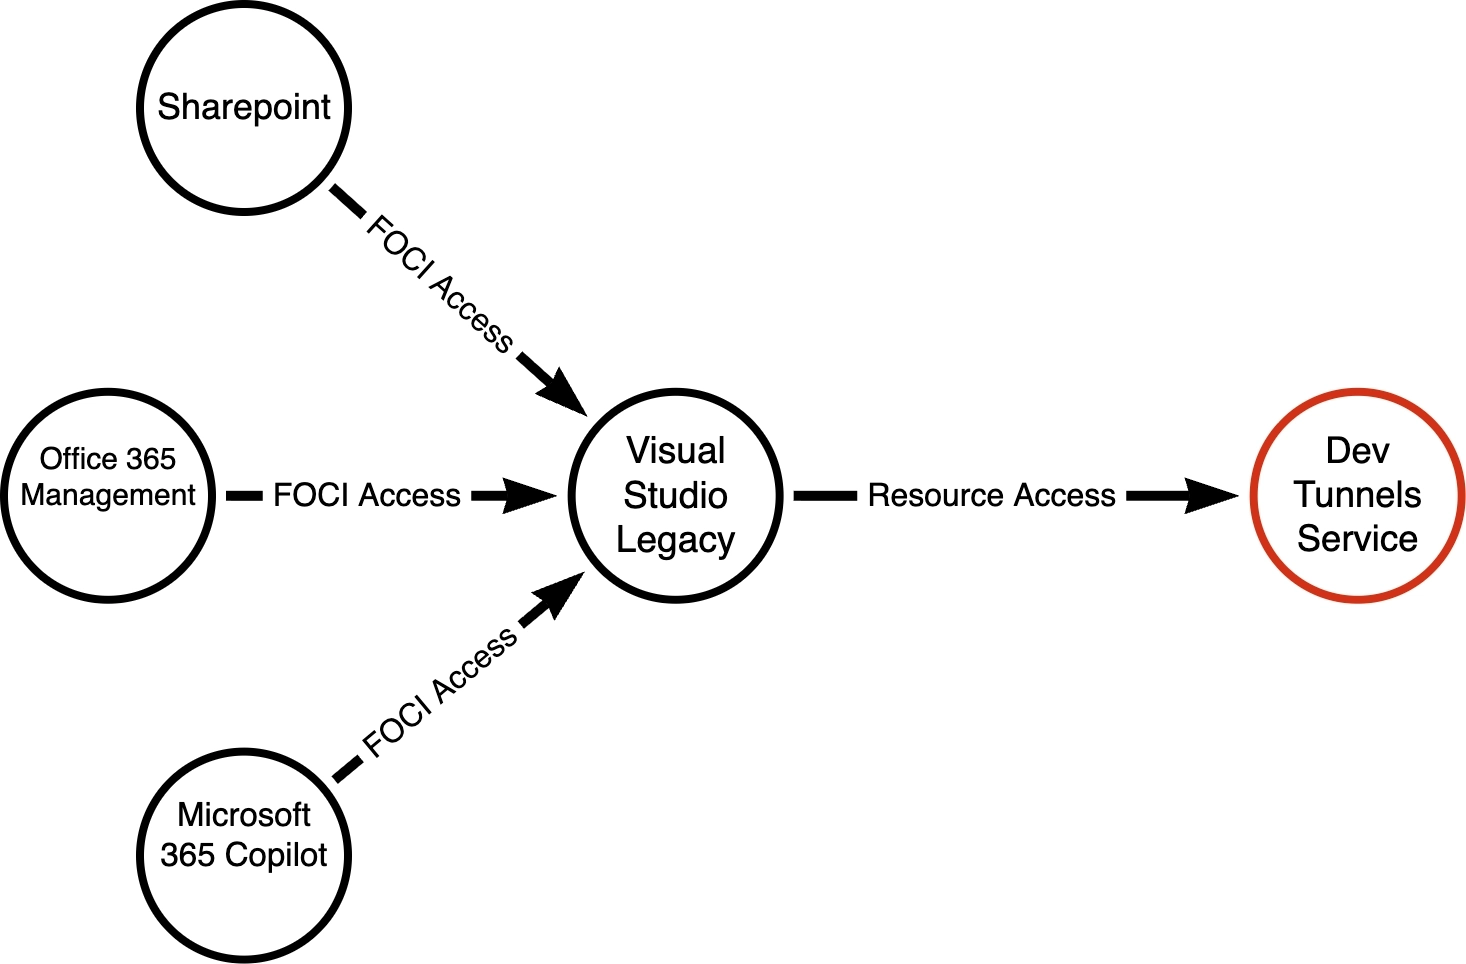
So let’s say that we use Device Code Phishing to request an access token for Teams:
Once completed, we take the resulting Refresh Token, and exchange this for an access token to Visual Studio - Classic:
Now at the time of testing, this worked well on Microsoft (aka Live) accounts, but unfortunately Entra ID tenants appeared to reject Visual Studio - Classic as a FOCI client. It may be that this has now been removed from the FOCI list.
In case this is true, I also moved over to review BroCI (NAA) clients, documented by fellow Specter Hope Walker here. Again BroCI extends the attack surface available to us.
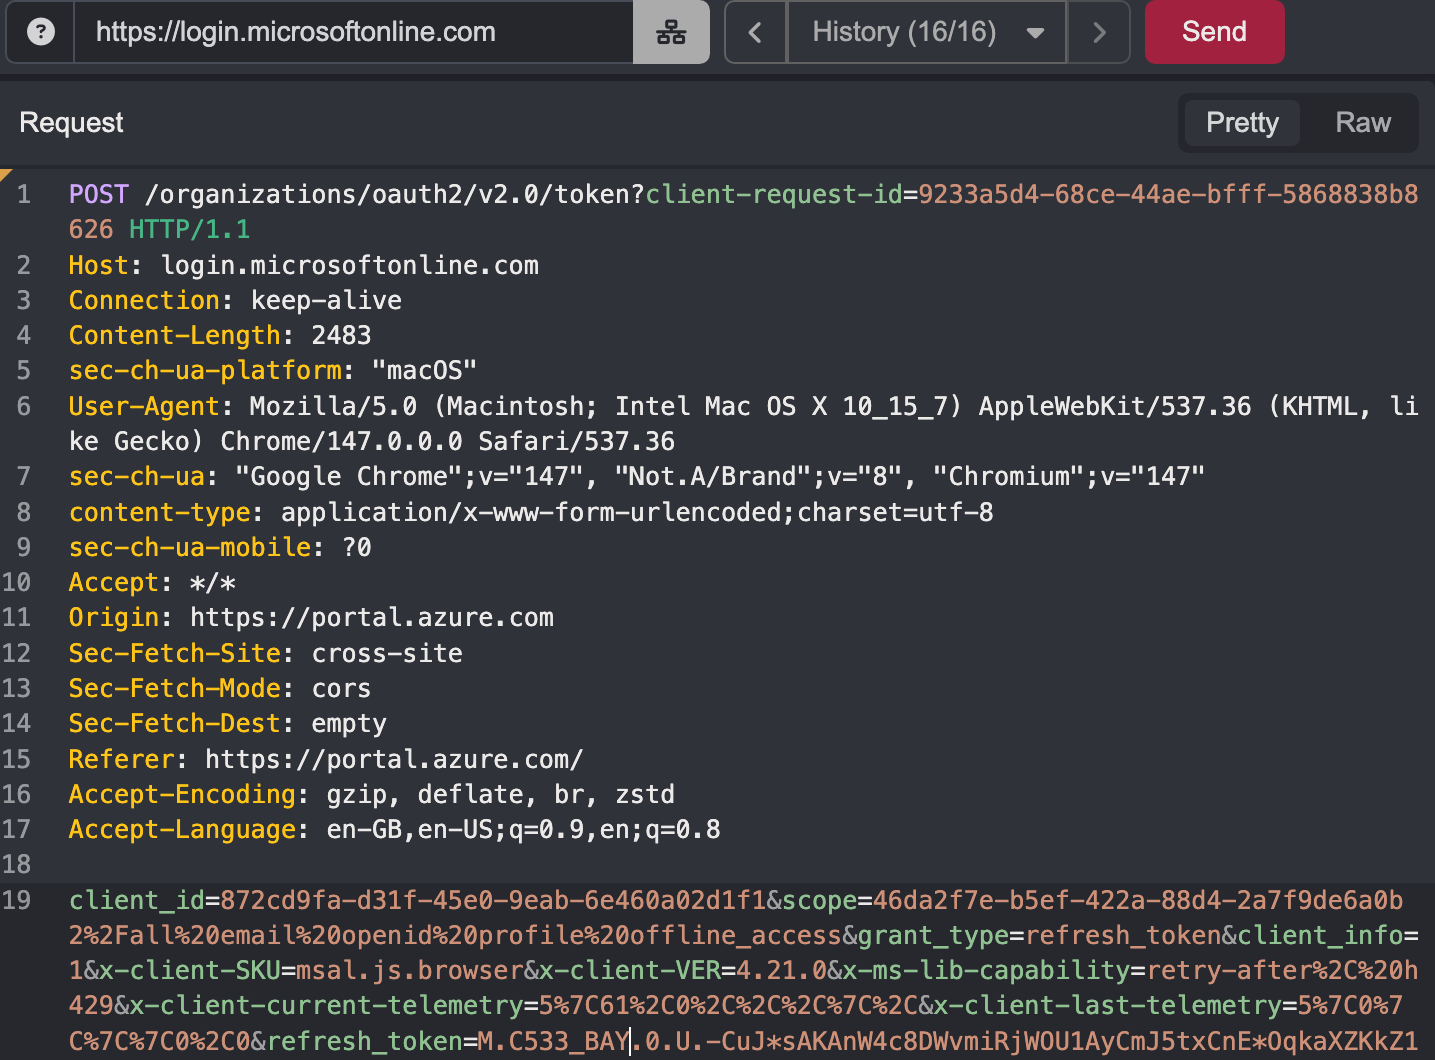
Reviewing BroCI options, we find the AzurePortal Console App.
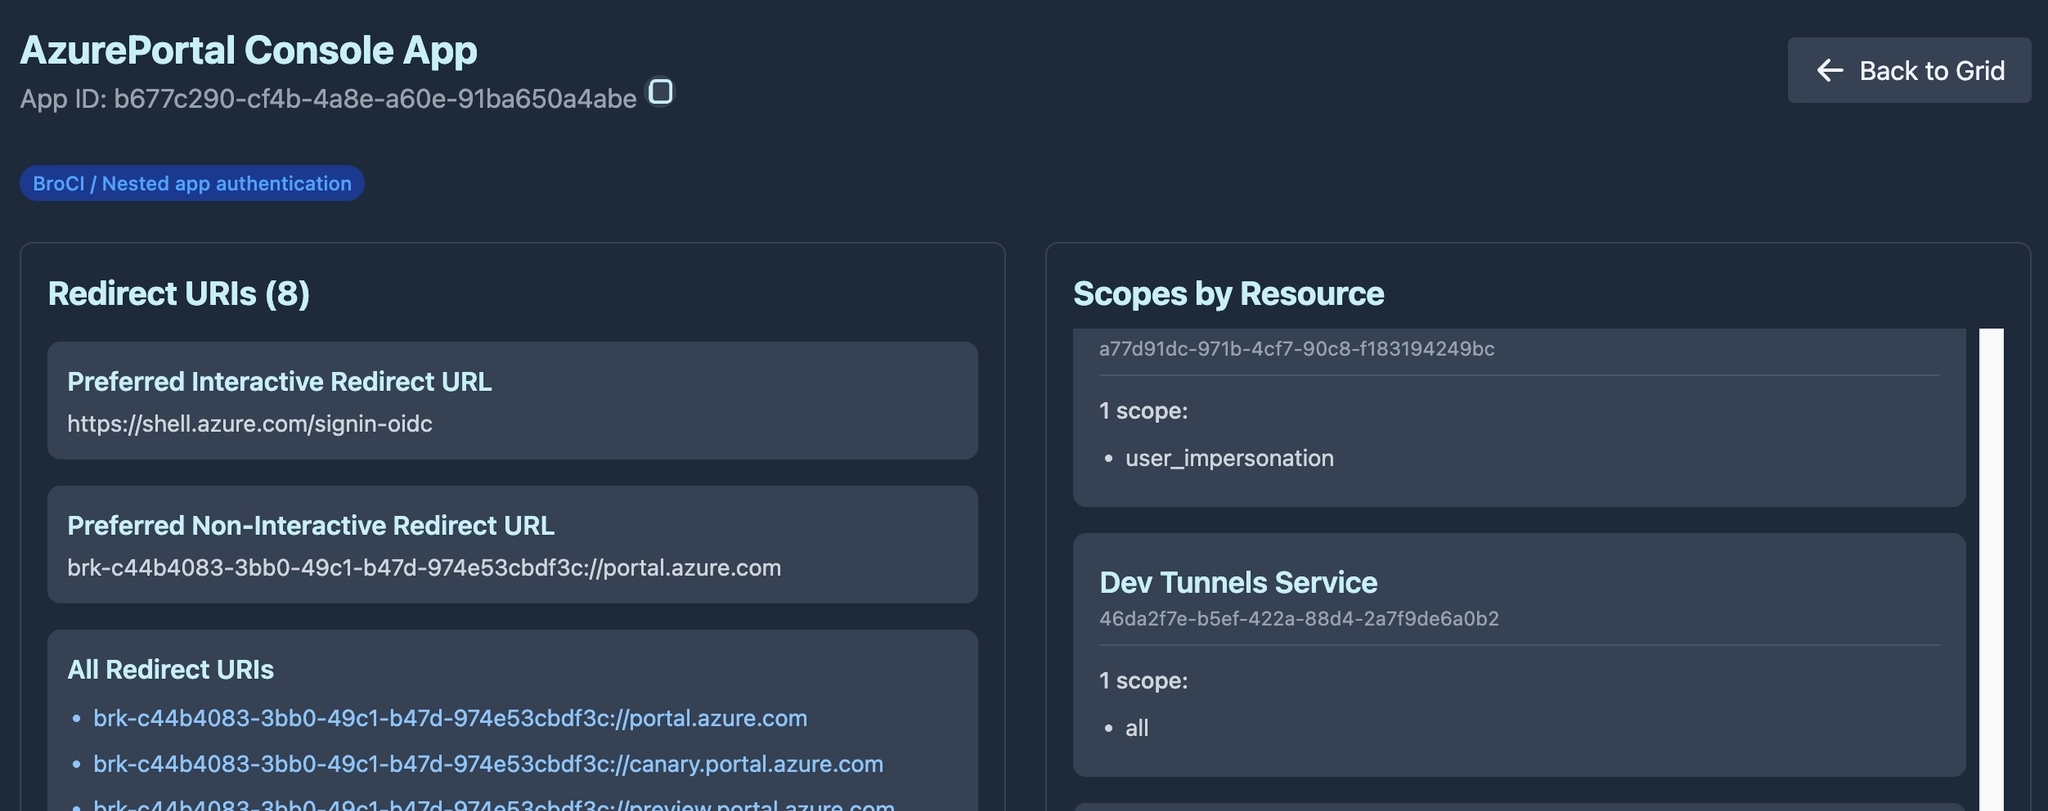
AzurePortal Console App is a Nested Application. As the Redirect URIs show, it relies on the Azure Portal Application as its broker to mint fresh access tokens. This means that if we have a session for a user to the Azure Portal, we have a path to also access Dev Tunnels for a user/organization.

Duality
I must admit, when I first came to complete the initial research on this project, I could see this becoming a blog post proclaiming “Look how cool it is that LLMs can do all of this”. It was only when I came to review attack paths that I questioned just how much Bishop actually was responsible for the content you are now reading. So I wanted to reflect on this slightly as I know that many others are questioning the same.
First up, when I started using LLMs, I knew that I would NEVER pass off LLM-created work as my own, and would ensure that LLM’s assistance is noted wherever I have used it. So here is the split for this research: Bishop mapped the dev tunnels protocol and created the russh crate patch. I built the first Ouroboros draft by hand (as evidenced here) and explored the attack paths to create the red-team framing. And most likely a model is helping with the review of this blog post, along with our amazing technical editor Sarah, who makes sure that the jumble of words that we produce actually translates into the coherent blog post you all get to read.
I think that we have established a good practice of crediting authors where their work was either used directly, or as inspiration for research. And given that we can see just how much LLMs rely on the work of others (try prompting for a novel research idea that you are working on, and you will see the difference that limited training data has) it feels wrong to take credit for what amounts to an accumulation of other hackers’ brainpower contributed freely on the Internet over the past 40 years. But just like we stand on the shoulders of giants, adding your own meaningful spin on LLM generated research should be celebrated as an achievement, while the assistance provided by models continues to be acknowledged.
That being said, this blog post did leave me with a few questions. The first being: “did I actually complete this research?”
It’s still a strange feeling to give an LLM a project and see such amazing results, without having to go through multiple evenings of pain. But for me, the reality is this:
On a professional level, it doesn’t matter! And by that I mean that the value isn’t delivered by the person who typed the code. The tool that I wanted to exist for other Specters to use during assessments has been created. It works, it fulfills the role that I’m paid to provide, and was created in a fraction of the time, allowing it to be available sooner than previously possible.
On a personal level, do I feel “robbed” of the discovery process or the chance to uncover a new technique? No. Again, what drives me forward in this field is the knowledge I gain by pulling apart a technology and understanding it thoroughly enough to apply my own malicious touch. And I can claim honestly that the feeling at the end of this project is the exact same as any I have done before it.
Now, what I could have done was to pipe the output of Claude or GPT to this blog post and call it a day. But as my goal remained the same, I instead sat down with the research output and hand-crafted the first draft of the Ouroboros tool myself, so that I understand exactly how everything fitted together.
The result was a very early POC that I made available internally:
Once I was happy that I had the level of knowledge I wanted to gain, and had my Notion playbooks updated with the new tradecraft, all that remained was the wiring in of the other RPC commands into the tool. This is what LLMs are efficient at, so I let Bishop move on and create the polished final product. This allowed it to be made available internally at a much quicker pace than would have previously been possible.
There was also another moment that did leave me wondering about Bishop’s contribution to the project, that being the Entra ID FOCI/BroCI section.
My research prompts were clearly framed to the model on building a C2 tool for Red Team purposes. At no point did GPT-5.4-Cyber make the connection of how Device Code Phishing could be applied during GitHub OAuth authentication. Similarly, there was no indication that FOCI could be used to pivot a refresh token into an access token used for jumping into an existing dev tunnel. Instead that connection came from the memory of sitting in a room of Specters and Dirk-jan for a week during his Entra training in 2024. Similarly, nowhere did BroCI come up when interacting with the model; that connection came from a memory of Chris, Hope, Darrius and Costa presenting BroCI at an internal hack-a-thon in Chicago early last year.
Now could the model have made the connection if asked directly? Absolutely. Could it have gotten there if guided towards the subject with prompting? Of course! But that is the point, I didn’t ask because at the time I didn’t know the direction that the research was heading in. Are there also multiple other ways that this technology could be exploited that the model could determine? I’m sure they exist, but surfacing them takes the right prompt, and forming the right prompt just takes more domain context than I’ve built yet.
Or to put it another way… the LLM did not wake up one Monday morning and choose violence. That was all me!
Prior Work
As I was putting together this blog post, I started to hunt for other research or posts that may have documented this protocol.
Karpagarajan Vikkii and Amanda Rousseau published an awesome writeup on Cursor at straiker.ai (https://www.straiker.ai/blog/nomshub-cursor-remote-tunneling-sandbox-breakout) at the beginning of April. This writeup clearly discusses the tunneling specification as well as highlighting the RPC commands, and I wanted to acknowledge their research. Originally when I saw that someone had published a writeup, I was going to cancel this blog post, but I think that given our diverging outcomes, there was still value in a red-team-focused tool and writeup.
One thing that stood out: although the research was based on Cursor, Cursor is a VS Code fork and uses the same dev tunnels protocol. So this post has applications well beyond VS Code.
Happy hunting h4xx0rz!